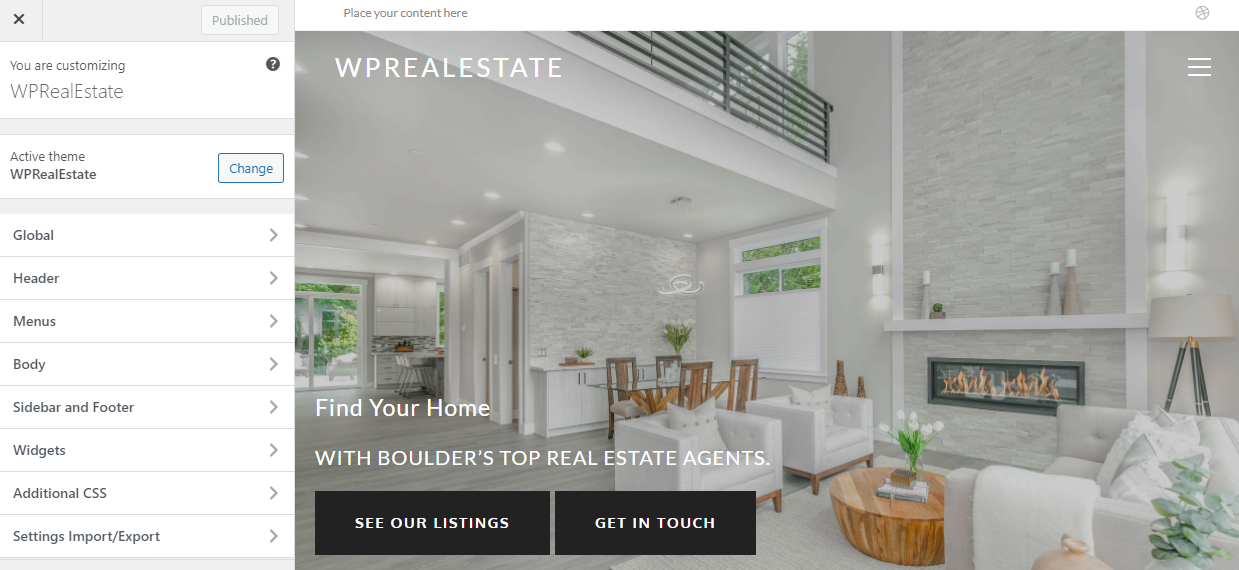
The WPRealEstate theme is also an all-in-one solution for designing and customizing your website design to fit your needs. No more sifting through templates and having to choose only one design. Our theme provides you with all the tools and options to place the control in your hands. Below we have listed the framework for each area of the theme that can be customized for your vision. These options are listed under Appearance > Customize in your WordPress dashboard:
INSTALL
SETTINGS IMPORT/EXPORT
GLOBAL
HEADER
- Main Header Settings
- Logo and Site Title
- Header Media
- Sticky Header
- Top Bar
- Side Panel
- Main Menu
- Dropdown Menus
- Mobile Menu
MENUS
BODY
- Blog Layout
- Single Post Layout
- Single Page Layout
- Search Results Page
- 404 Error Page
- Breadcrumbs
- Pagination
- Forms
- Scroll To Top
SIDEBAR AND FOOTER
WIDGETS
ADDITIONAL CSS
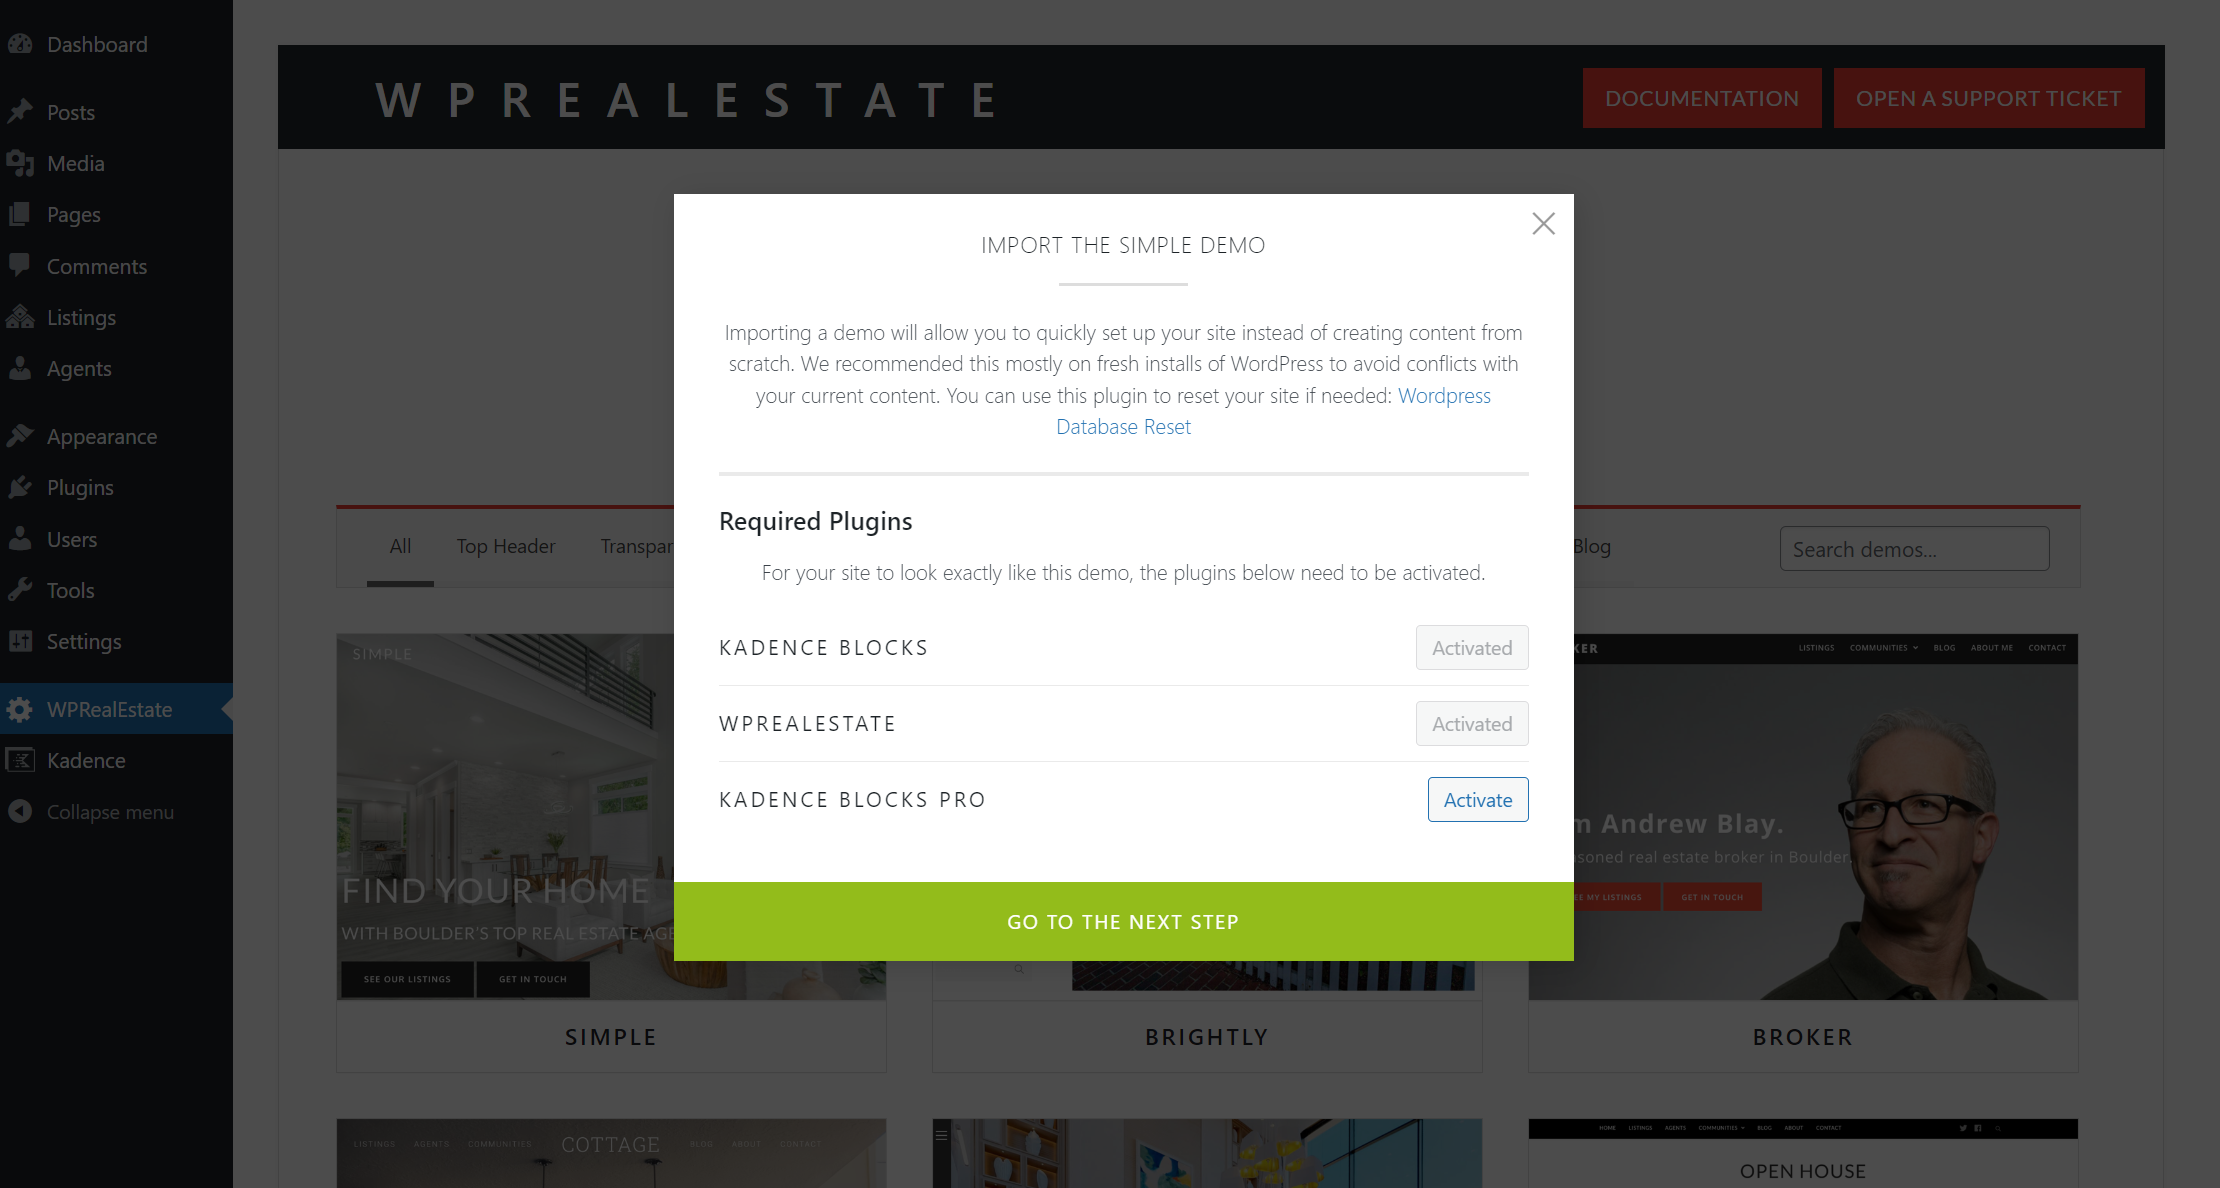
If you are also using the WPRealEstate, our theme offers the ability to import complete, exact copies of our demos. Just go to the WPRealEstate page from your admin main menu, and click to import one of the demos.
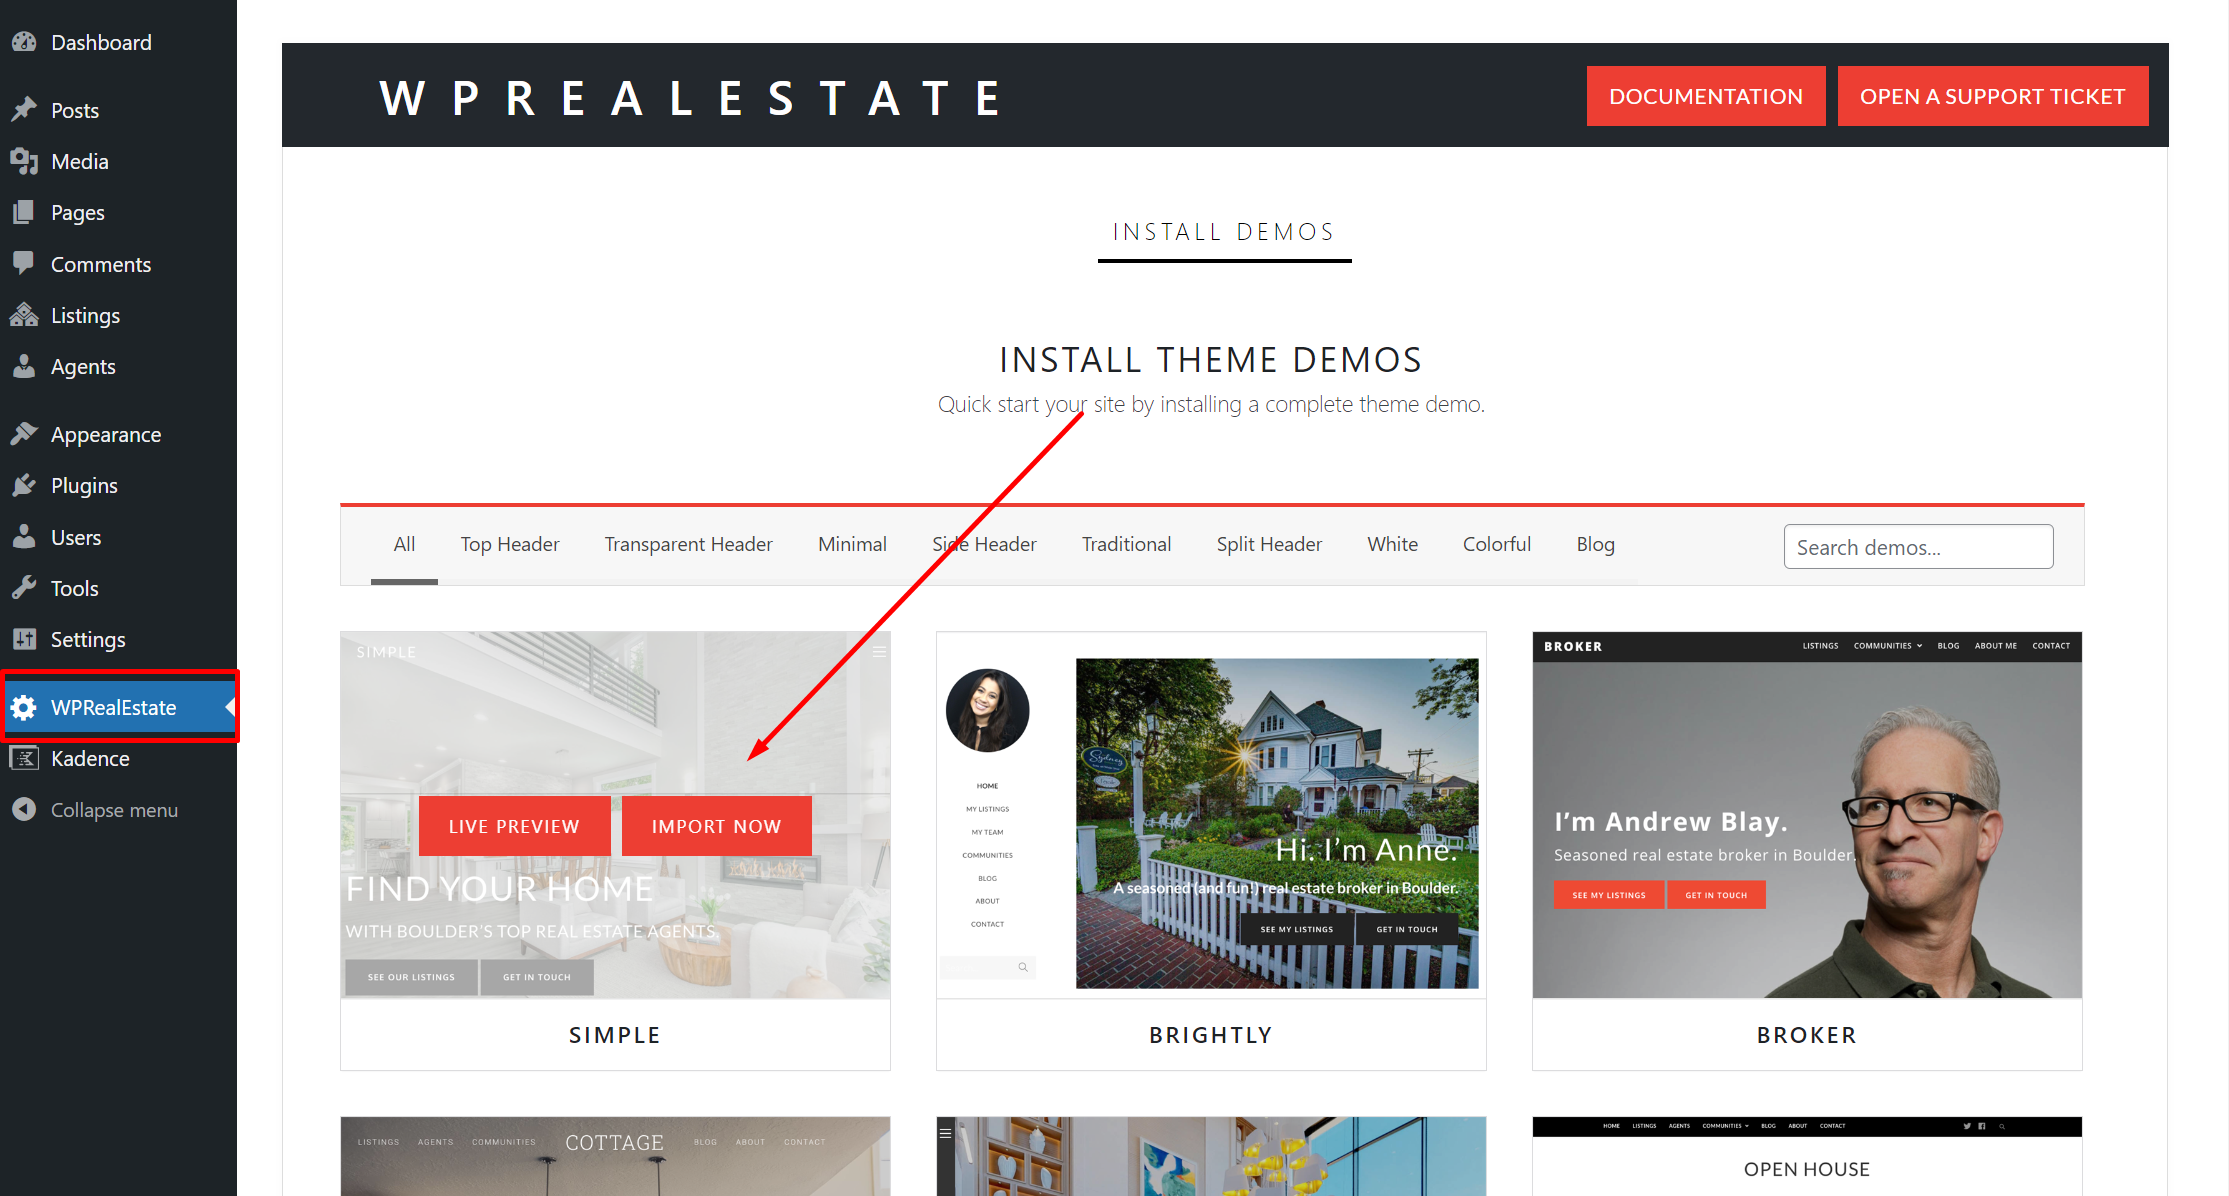
The import process will also install the WPRealEstate plugin if it’s not already installed, and will import demo Listings and Agents, including all needed pages.
This is by far the easiest way to get started.
The WPRealEstate plugin has the following categories of functionality
1. ADD & DISPLAY MANUAL LISTINGS
When you install the plugin, you will see a new menu item for Listings. Just click Add New, fill out the content, fields, categories, and featured image. When you publish, each Listing will exist as a page that is visible on the front end. You can then display Listings using the Display Listing Block or Map Block.
2. DISPLAY MLS LISTINGS
The plugin can display listings from the MLS. This is limited to real estate professionals who are members of a multiple listing organization. You will need to work with your multiple listing organization to get the credentials and authorization to configure this. Once you have the information from your MLS, you will add some settings configuration on the plugin settings page, and then you can display your MLS listings using the Display Listing block.
3. MAP BLOCK
The plugin includes a Map Block that you can use to show the location of one or multiple manual listings. When you click a property on the map, you’ll get a small pop-up that you can click through to open up a single listing.
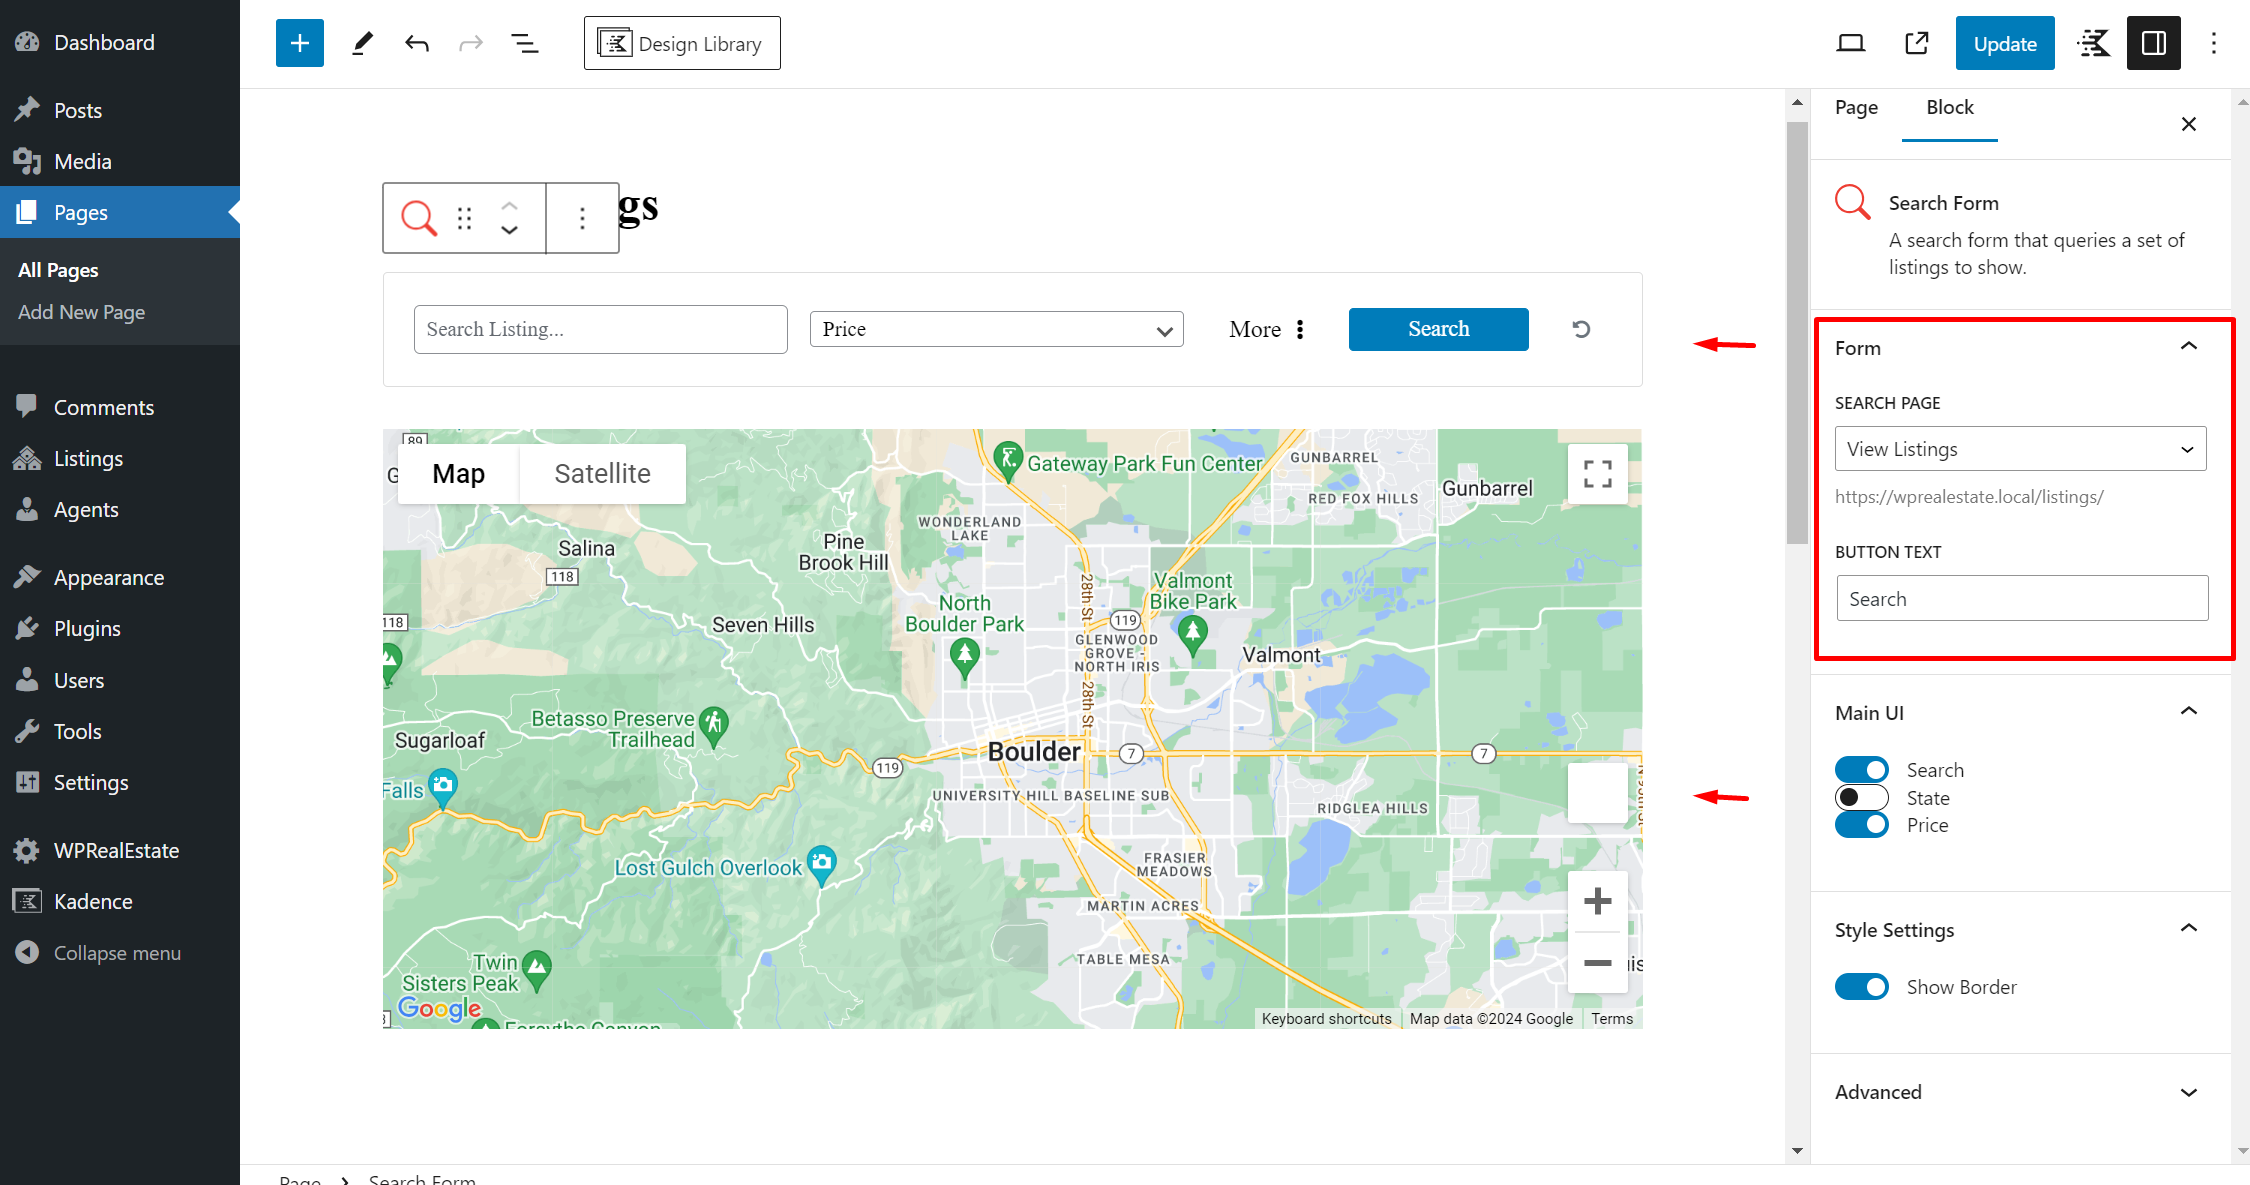
4. SEARCH FORM BLOCK
You can add a search block on any page of your website that will allow users to search either manual or MLS listings.
5. SEARCH PAGE
To use the Search Block, you’ll need to configure a Search Page. This page will have the complete common interface you are used to on real estate websites with a map, a search and filtering interface, and a list of listings that match your search at any given time. This page is very useful in its own right, but will also be the page to which the Search Block directs your users when they start a search.
6. AGENTS
When you install the plugin, you will see new menu items for Agents. Just click Add New, fill out the content, fields, categories, and featured image. When you publish, each Listing will be visible on the front end. You can also then display Listings using the Display Listing block or Map block.
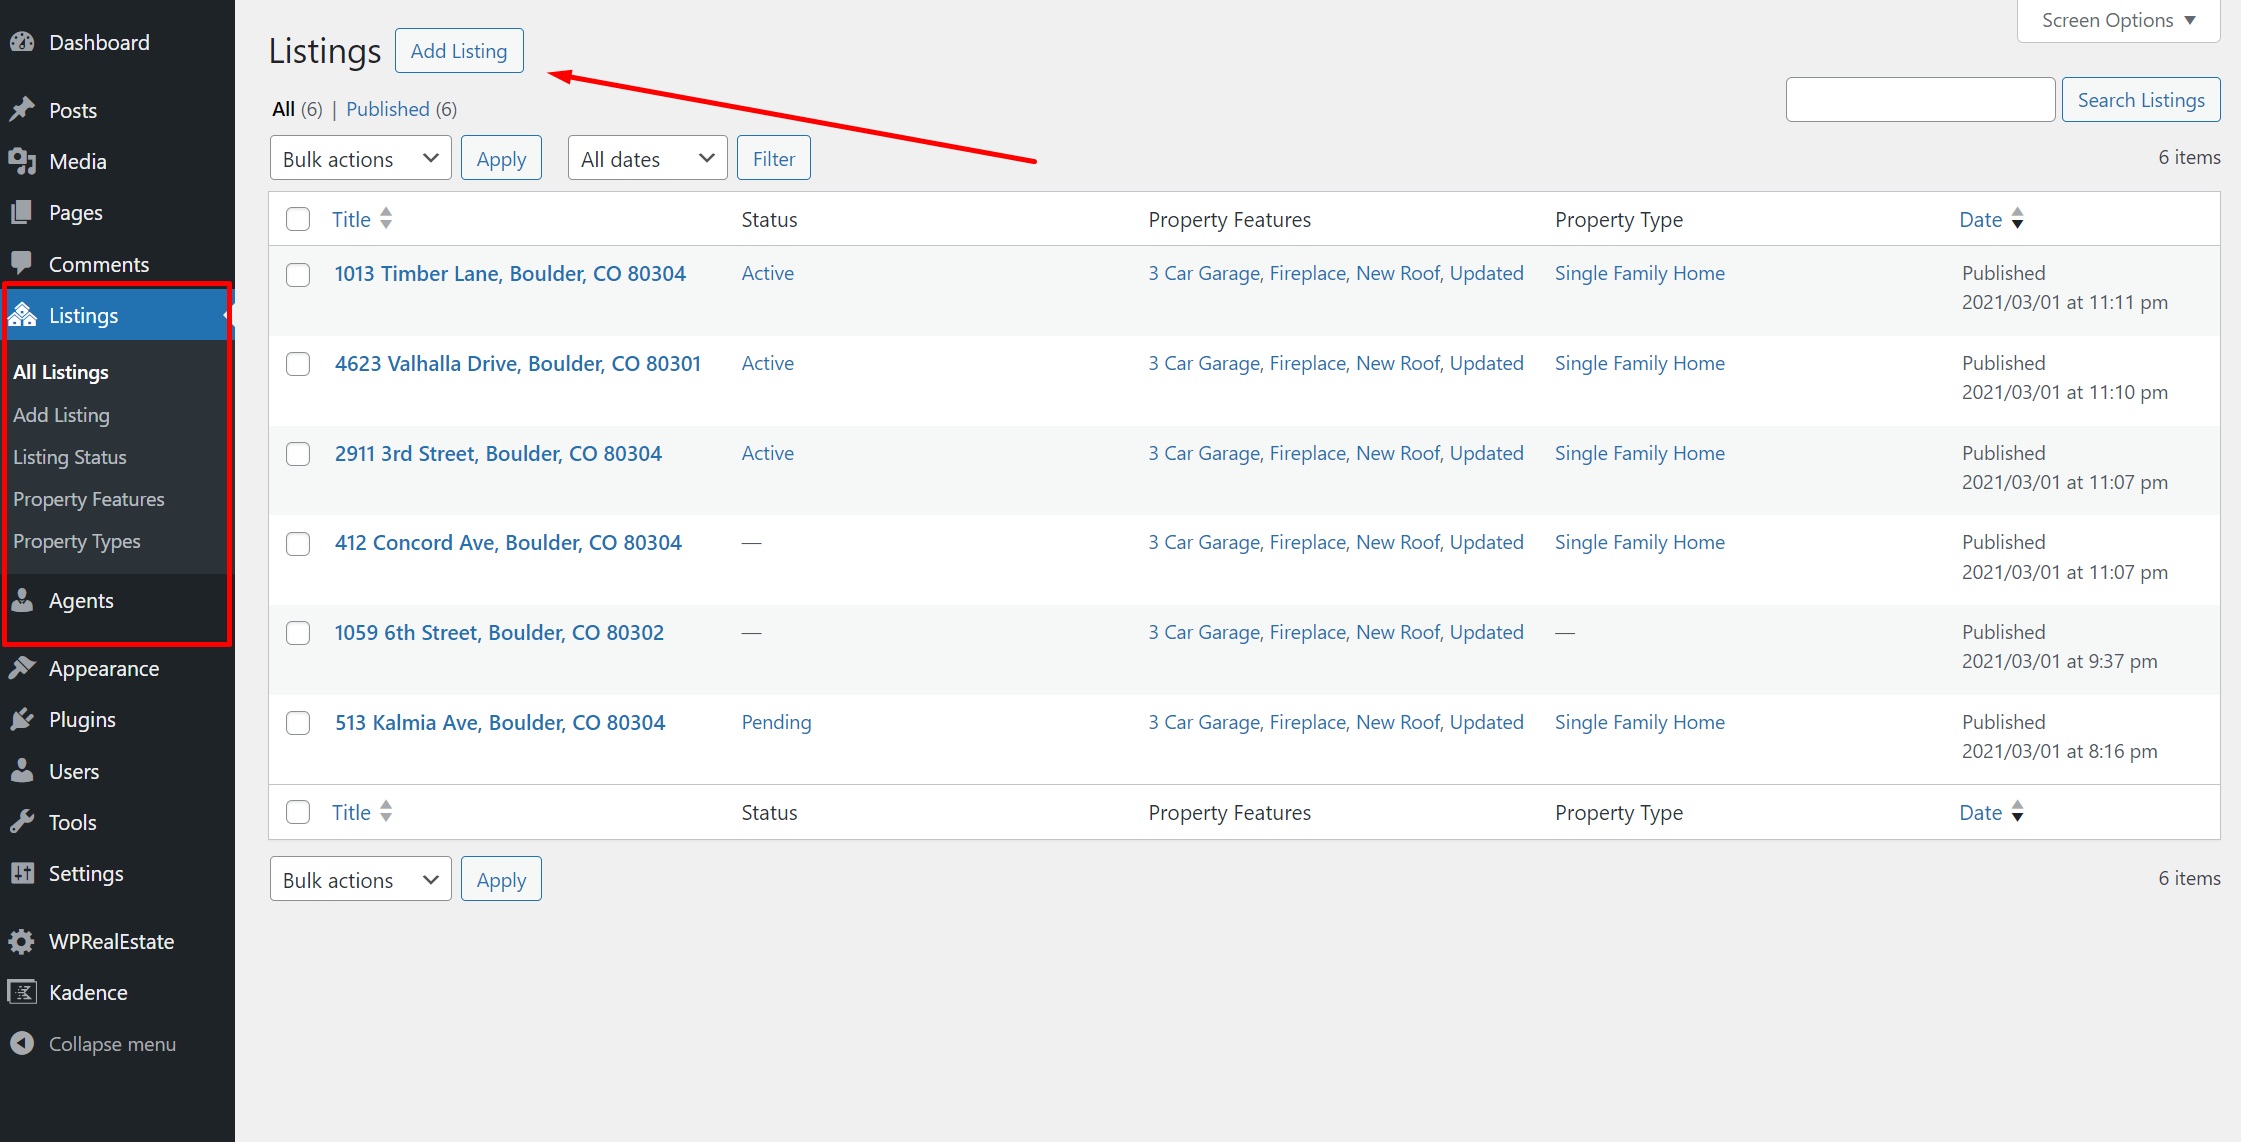
When you activate the plugin, a new menu item “Listings” will appear on your main menu.
To add a Listing, click on Listings > Add New from the main menu. Each new listing page will be pre-populated with the blocks needed to add your listing.
IN THE MAIN CONTENT AREA
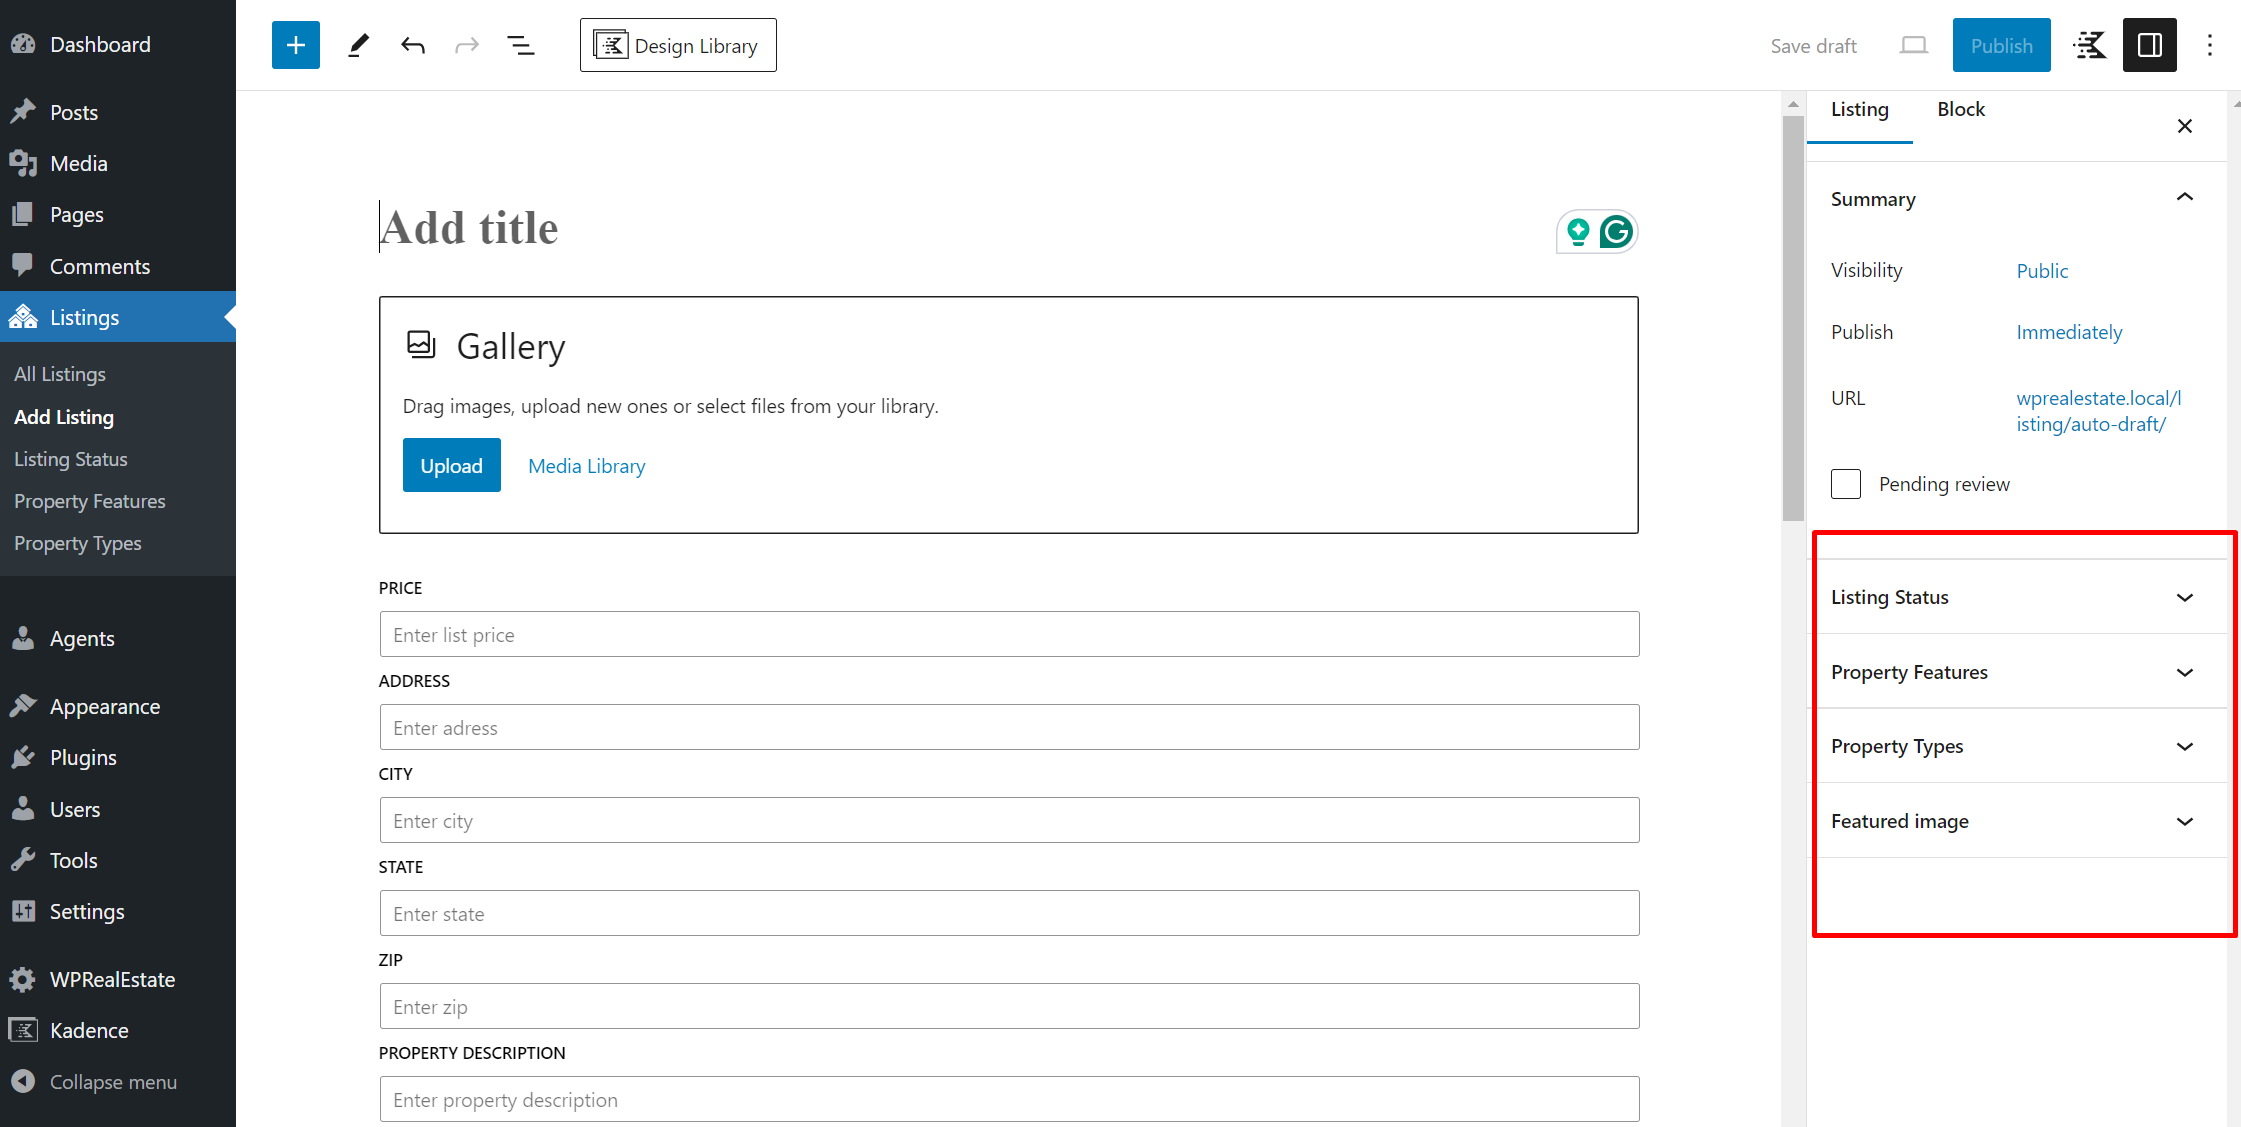
PAGE TITLE. Add a Page title. It’s often useful to just use the entire Listing address here for reference.
GALLERY. Add images via the gallery block.
LISTING DETAILS. Fill out each of the listing details. None of these are required. But a complete listing will display better and work better for mapping, search, and other functionality.
LISTING AGENT. If you have already added some Agents, you’ll be able to select a Listing Agent here, too, which will display at the bottom of your listing. You need to add Agents (see below) before you’ll be able to do this.
ON THE SIDEBAR
FEATURED IMAGE. Add a featured image. This image will represent the property when it is included in lists or search results.
LISTING STATUS, PROPERTY FEATURES, AND PROPERTY TYPE. On the page sidebar, you can also add Listing Status, Property Features, and Property Types. There’s no specific terms you need to use for these, but it’s useful to be consistent across your listings as it will help with display and search later.
VIEWING YOUR LISTING
Once you publish your Listings, a page will automatically be created on the front end with all the listing details. The URL for each listing is:
www.yourdomain.com/listing/the-title-of-your-listing
It’s common to have a main page that showcases your listings. You might also have a neighborhood page that showcases listings from a certain area.
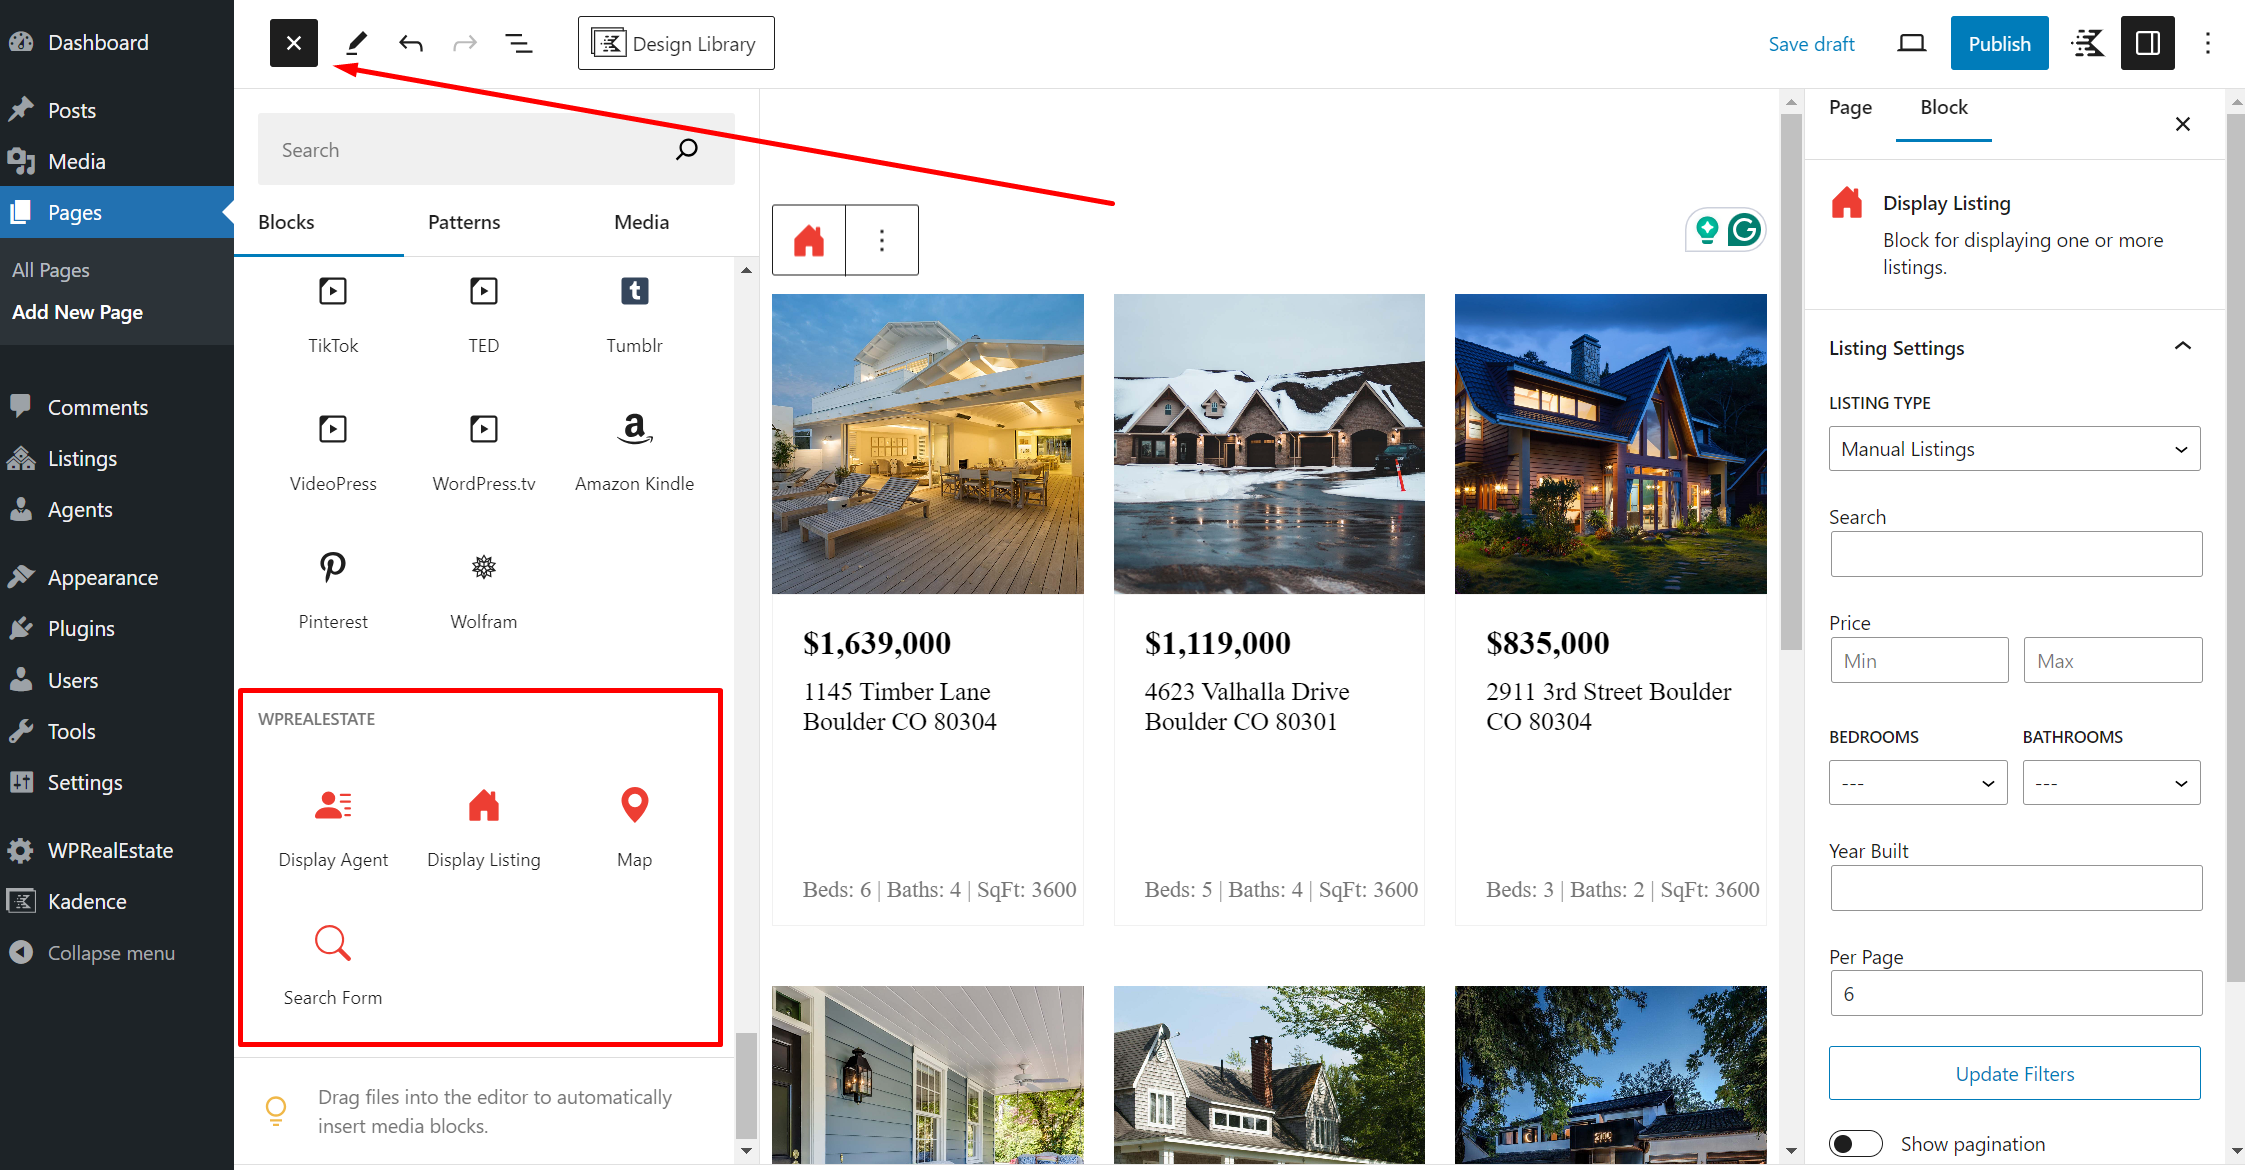
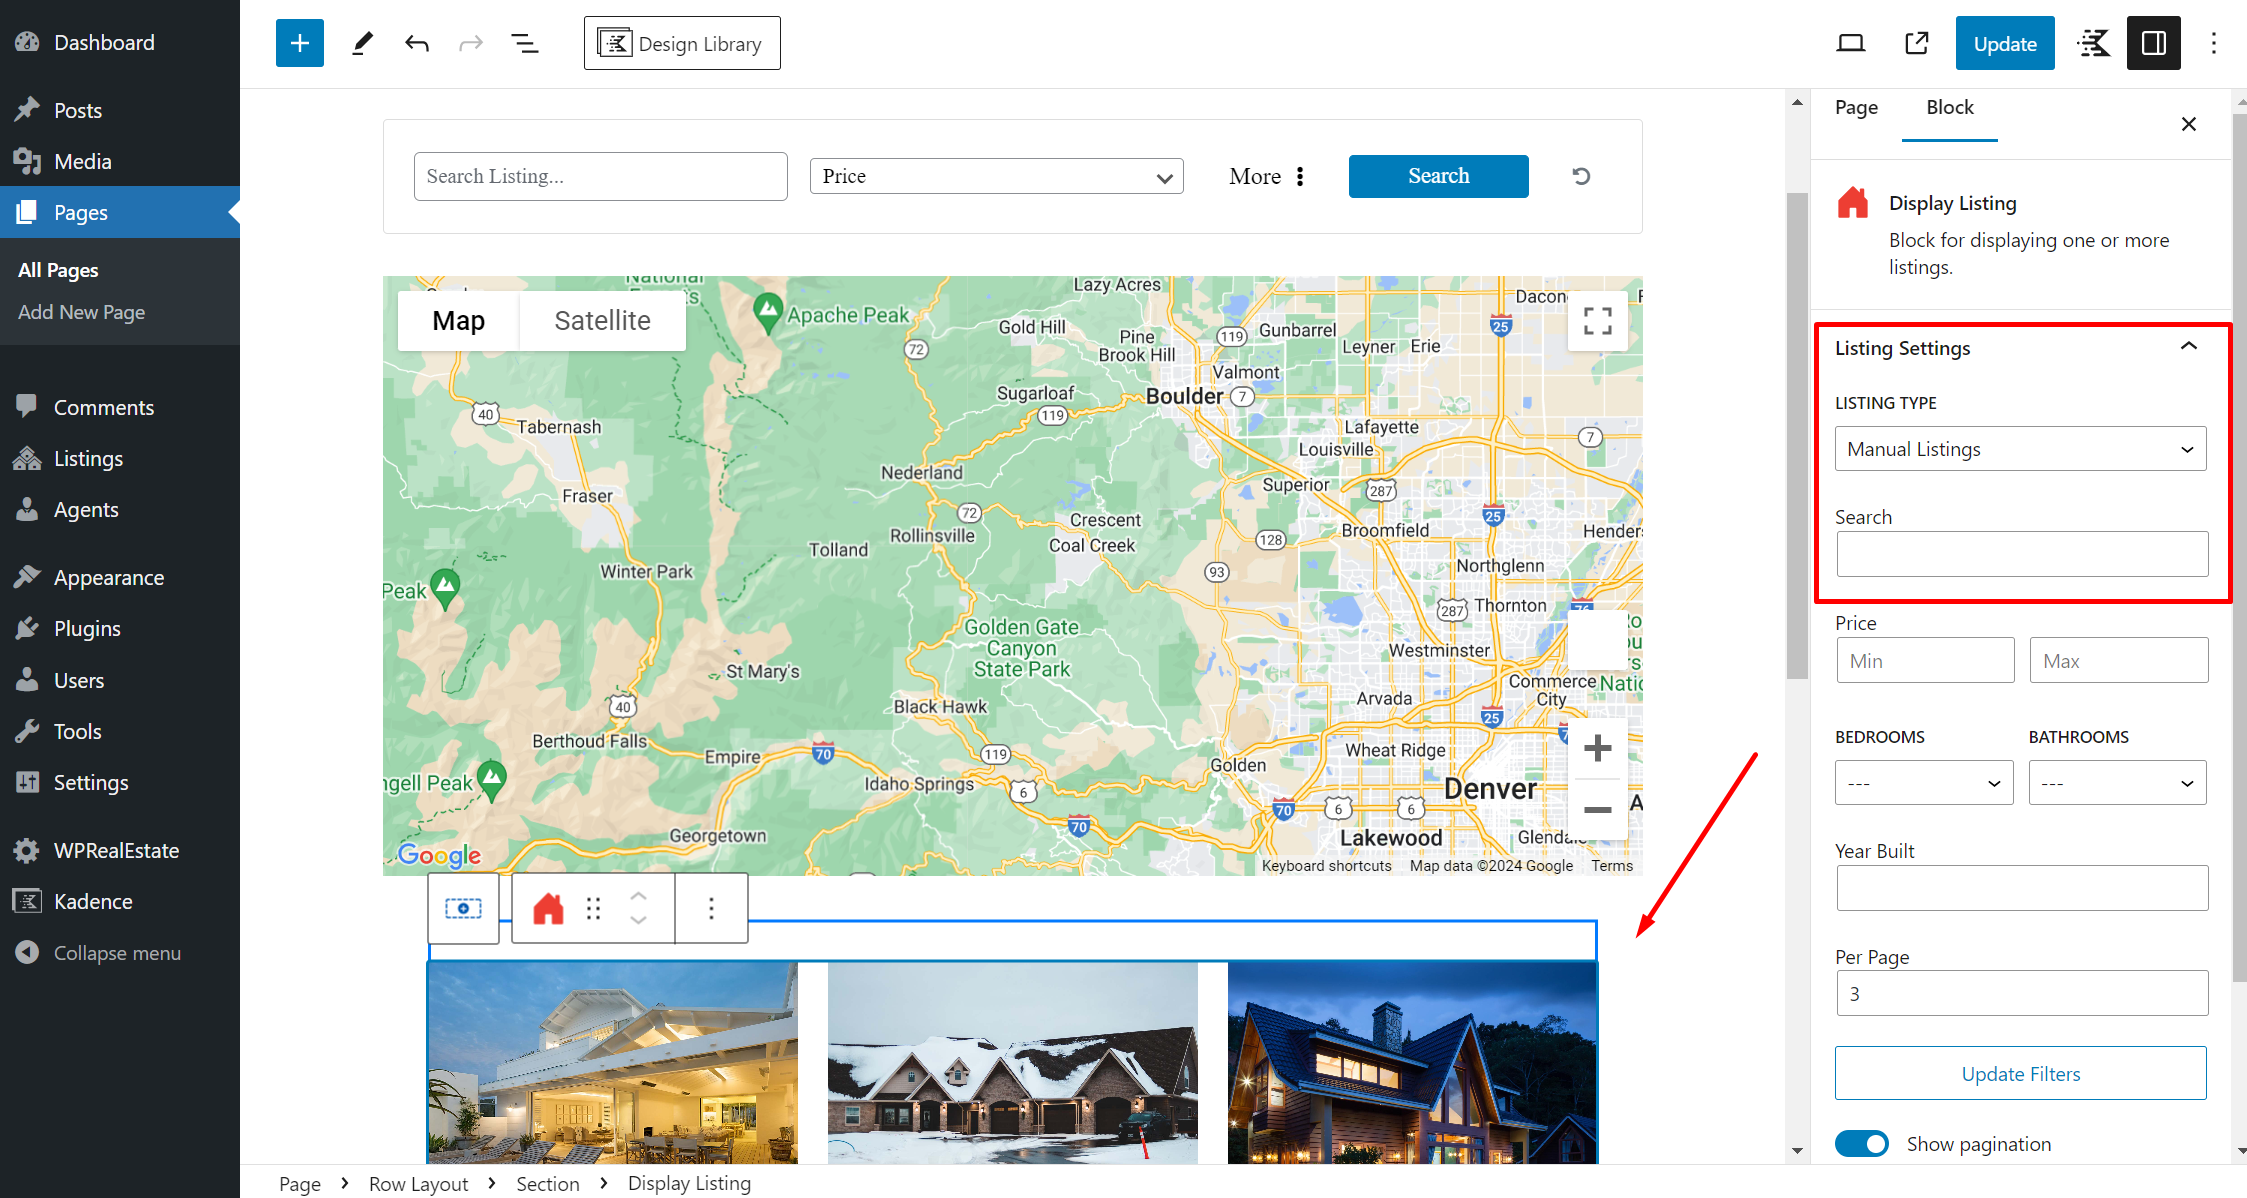
To add a group of listings in this way, use the Display Listing Block.
ADD THE BLOCK. Go to any page or post, and add a Display Listing block.
SELECT MANUAL LISTINGS. In the block settings on the sidebar, be sure to select Manual Listing as the source. Later we’ll talk about how to configure MLS listings.
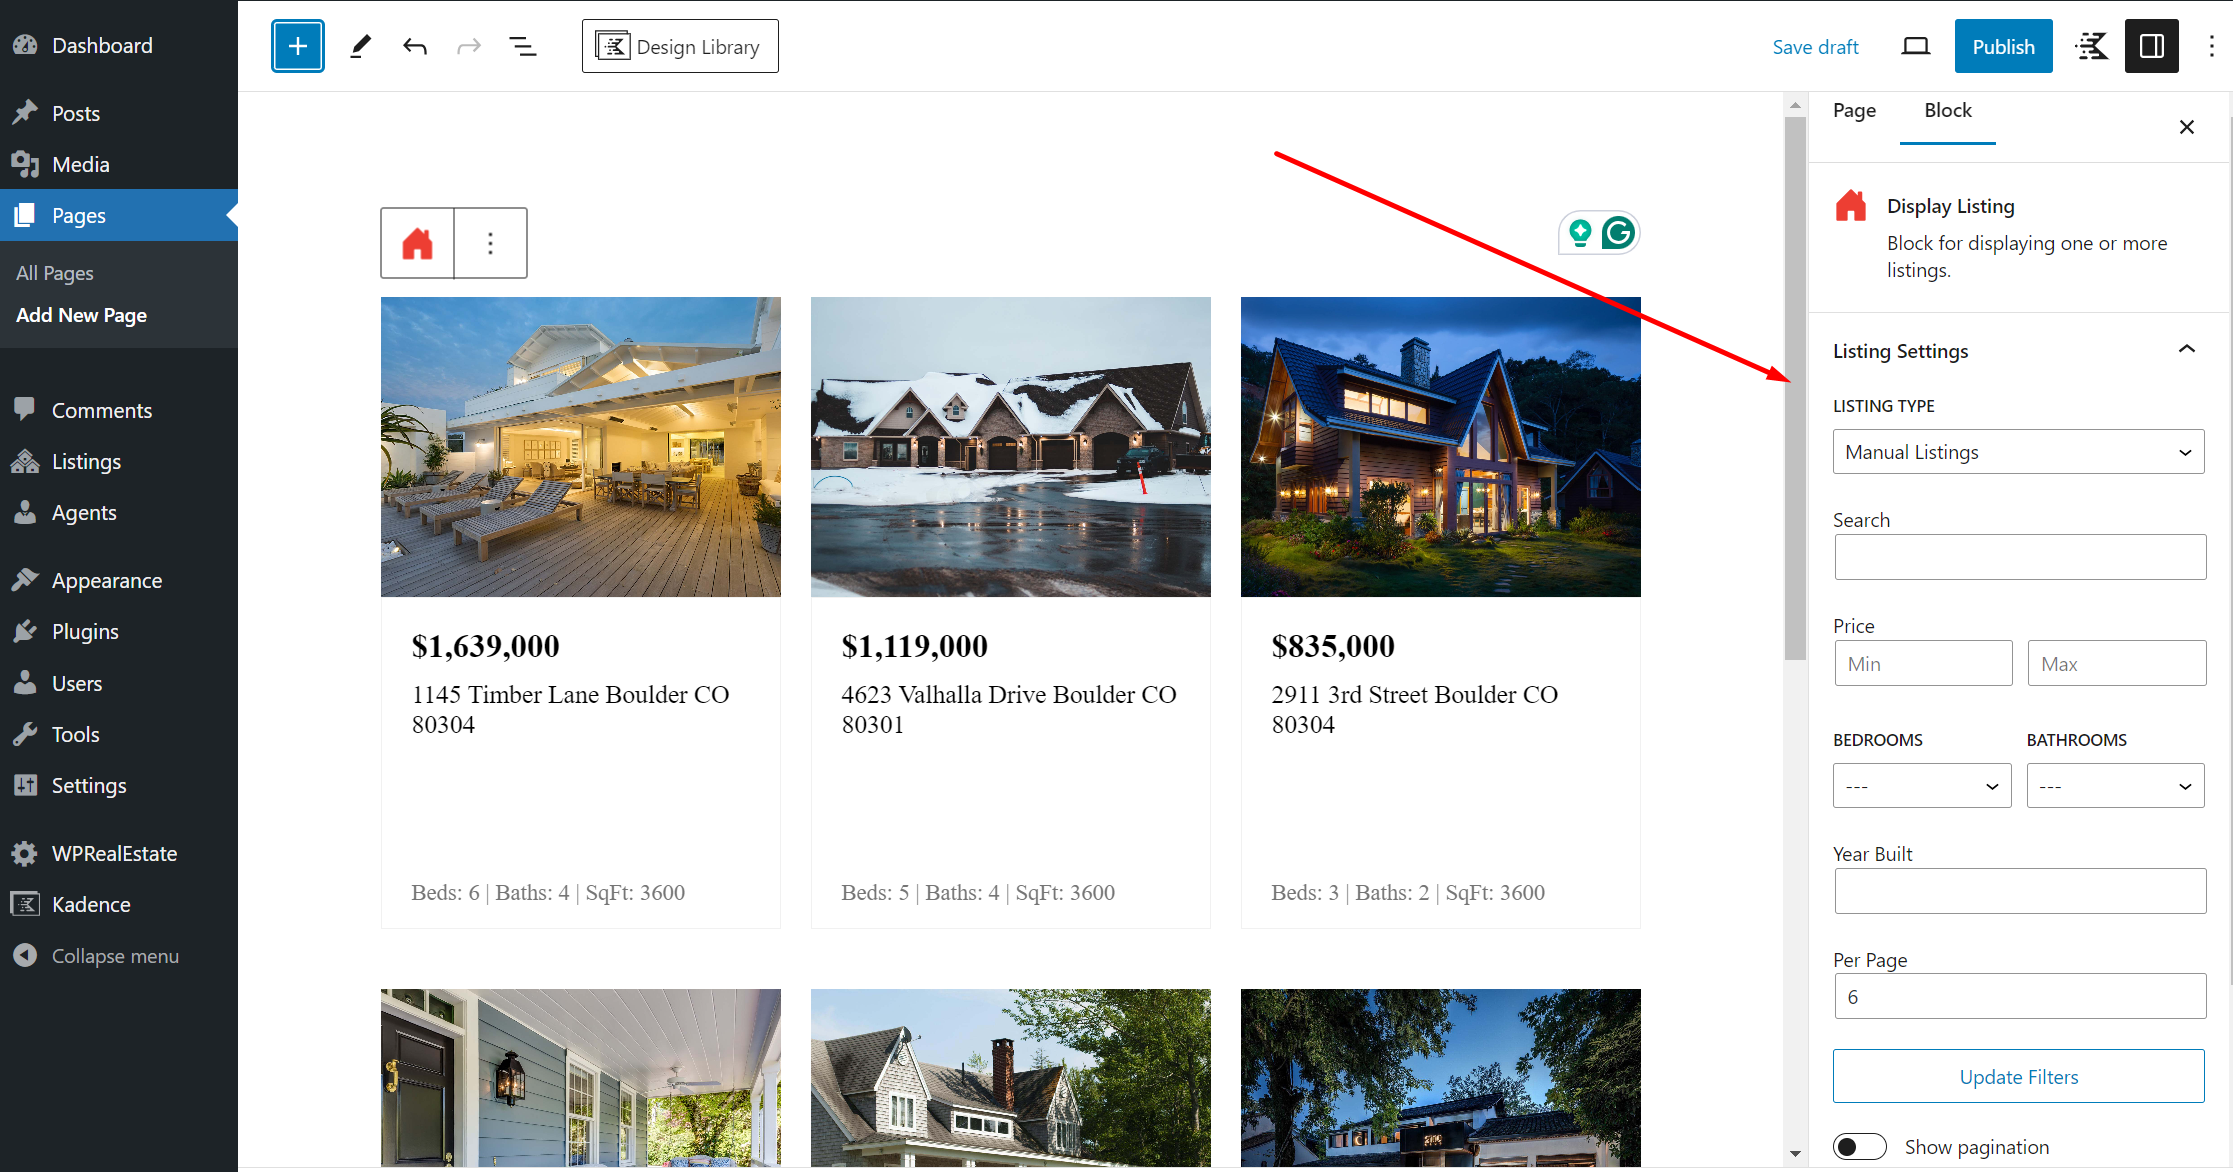
CONFIGURE WHICH LISTINGS TO SHOW. From the block settings, you can set how many listings you want to show. You can show all listings, or you can filter and only show specific listings. To filter, just enter all or part of the property name or address. Add multiple separated by commas. Note: the search is case-sensitive.
CONFIGURE STYLE SETTINGS. From the block settings, you can also adjust the layout, columns, and other styles of the display.
MLS LISTINGS ARE COMING SOON!
The functionality for adding MLS listings is ready, but we’re doing final testing.
If you are interested in adding MLS listings to your website, please reach out. We may be willing to offer free custom web services, and to work with you and your multiple listing organization to fully set up MLS on your website.
WEB API VS RETS
Real estate professionals who are members of Multiple Listing Organizations (MLO) can display MLS listings on their websites.
WEB API VS RETS
For much of the last 20 years, the real estate industry has used the RETS api to fetch and display MLS listings. The RETS system worked well, but was quite complicated. It required that you duplicate an entire MLS listing database locally (often tens of thousands of records), and periodically update your local copy. The storage costs and complexity gave rise to many third party services that would do this for you often for a hefty fee.
Staring in 2018, the industry introduced a new, modern web-based api (the RESO Web API) as a new standard. This is much easier, simpler, and cheaper to use. With the Web API, MLS data is stored by the MLO itself. Our plugin can send requests to that MLO, get back one or more listings, and display them. You no longer need to replicate, manage, and update a database locally.
In short, our plugin uses the new Web API. It’s a better and simpler solution, and is the industry’s new standard. The rest of this section walks through how to set that up.
GET AUTHORIZATION & ACCESS DETAILS FROM YOUR MLO
MLS listings are controlled by Multiple Listing Organizations. To display them on your website, you will first need to get permission and access details from your MLO.
We use the Web API, you’ll really need two important pieces of information:
Who provides your MLO’s API service? In some cases, your MLO may provide it’s own API service, meaning we send our requests directly to your MLO and get the data from them. But many MLO’s have chose to use third party providers who effectively act as intermediaries. The most common third party provider are Bridge Associates and CoreLogic.
What credentials do you need? Depending on who provides your API service, you’ll need different information – either an access token or a username/password combination. We already know how Bridge Associations and CoreLogic work, so we’ve anticipated that in the settings. If your MLS is providing the API service directly or using another third party service, you’ll need to ask them which of the above you need.
SET UP AND CONFIGURATION
Once you have the above information, go to our plugin settings page, and fill out the details.
First, select the provider of your API service. We provide four options: Bridge Associates, CoreLogic, Your MLO Directly, Other Third Party.
Second, depending on which of the above options you provide, we’ll provided the needed fields to add any credentials or access tokens. If you are using Bridge Associations or CoreLogic, we already know in advance what they need, and we show the needed fields. If the first field is Your MLS Directly or Other Third Party, you will need to specify whether you are providing an access token or a username/password combination.
DISPLAY LISTING BLOCK
ADD THE BLOCK. Once you’ve configured your settings, go to any page or post, and add a Display Listing block.
SELECT MLS LISTINGS. In the block settings on the sidebar, be sure to select MLS Listing as the source.
CONFIGURE DISPLAY SETTINGS. From the block settings, configure any display settings.
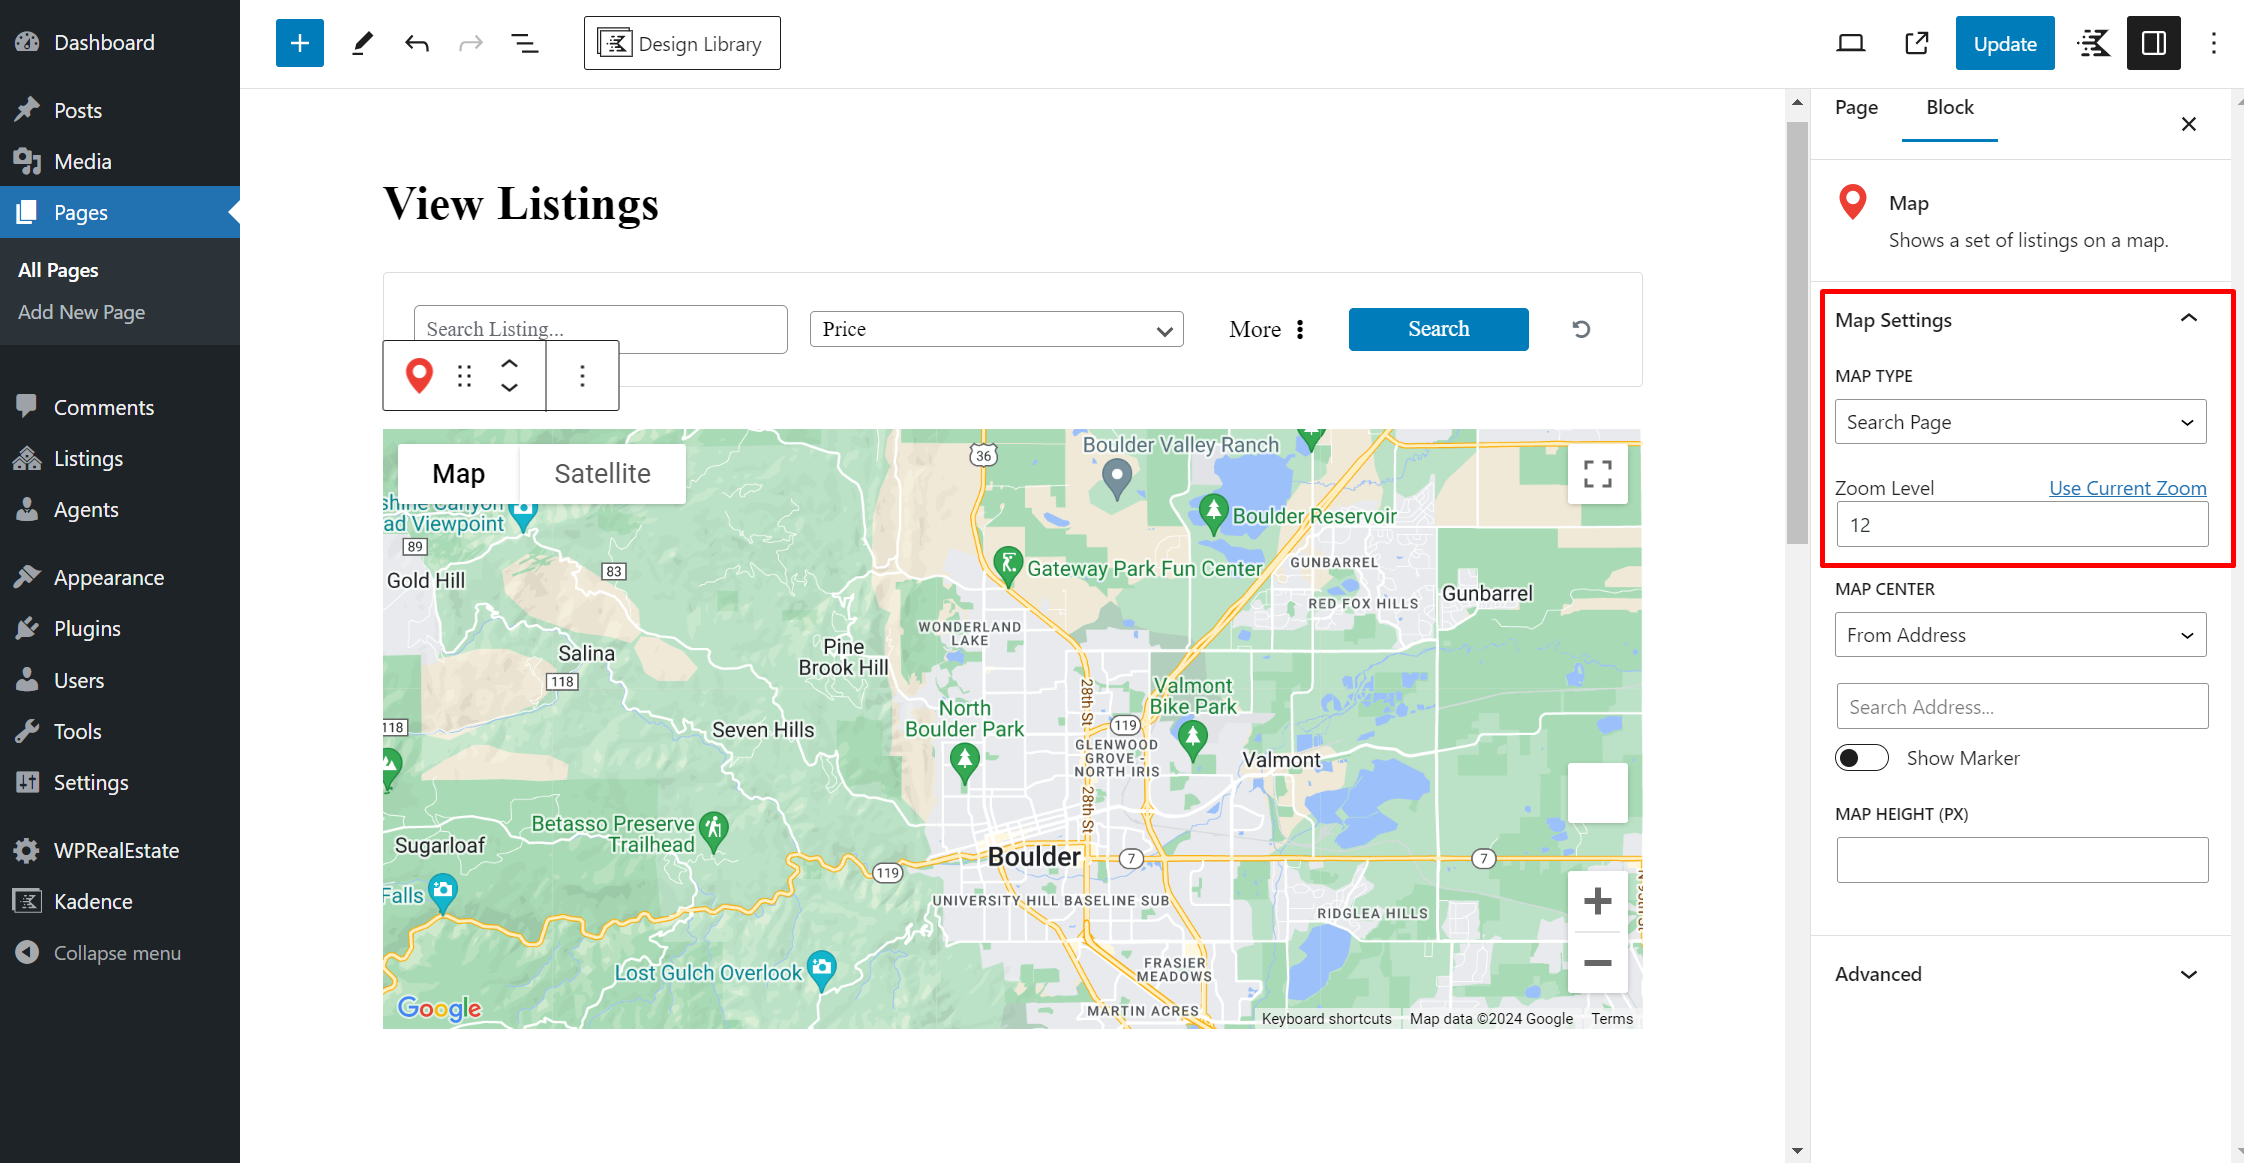
You can add a map block on any page or post that shows a map with markers for one or more properties.

ADD THE BLOCK. Go to any page or post, and add a Map Block.
CONFIGURE SETTINGS. From the block settings, configure any display settings.
- Map Type. Unless you are adding the map to your Search Page, you should select “Show Listings” as the Map Type.
- Zoom Level. This sets how zoomed in or out the map is when it loads. Smaller numbers are zoomed in closer. Usually 12 or so is a good starting point.
- Map Center. You need to set an initial center for the map. You have two choices. First, you can use any address you type in to be the center. Second, you can use your listings as the center. To do this, you must first go to the Listings Panel on the sidebar and add one or more listings, then select the listing you want as the center.
- Adding Listings. To add one or more listings to the map, go to the Listings panel on the sidebar. You can start by typing any part of the listing, and you’ll see a list of available Listings in the drop-down. Select as many as you like.
The plugin offers a search block that allows users to search and then filter manual or MLS listings.
CONFIGURE A SEARCH PAGE. For the Search Block to work, you must first configure a Search Page. See the documentation section below for details.
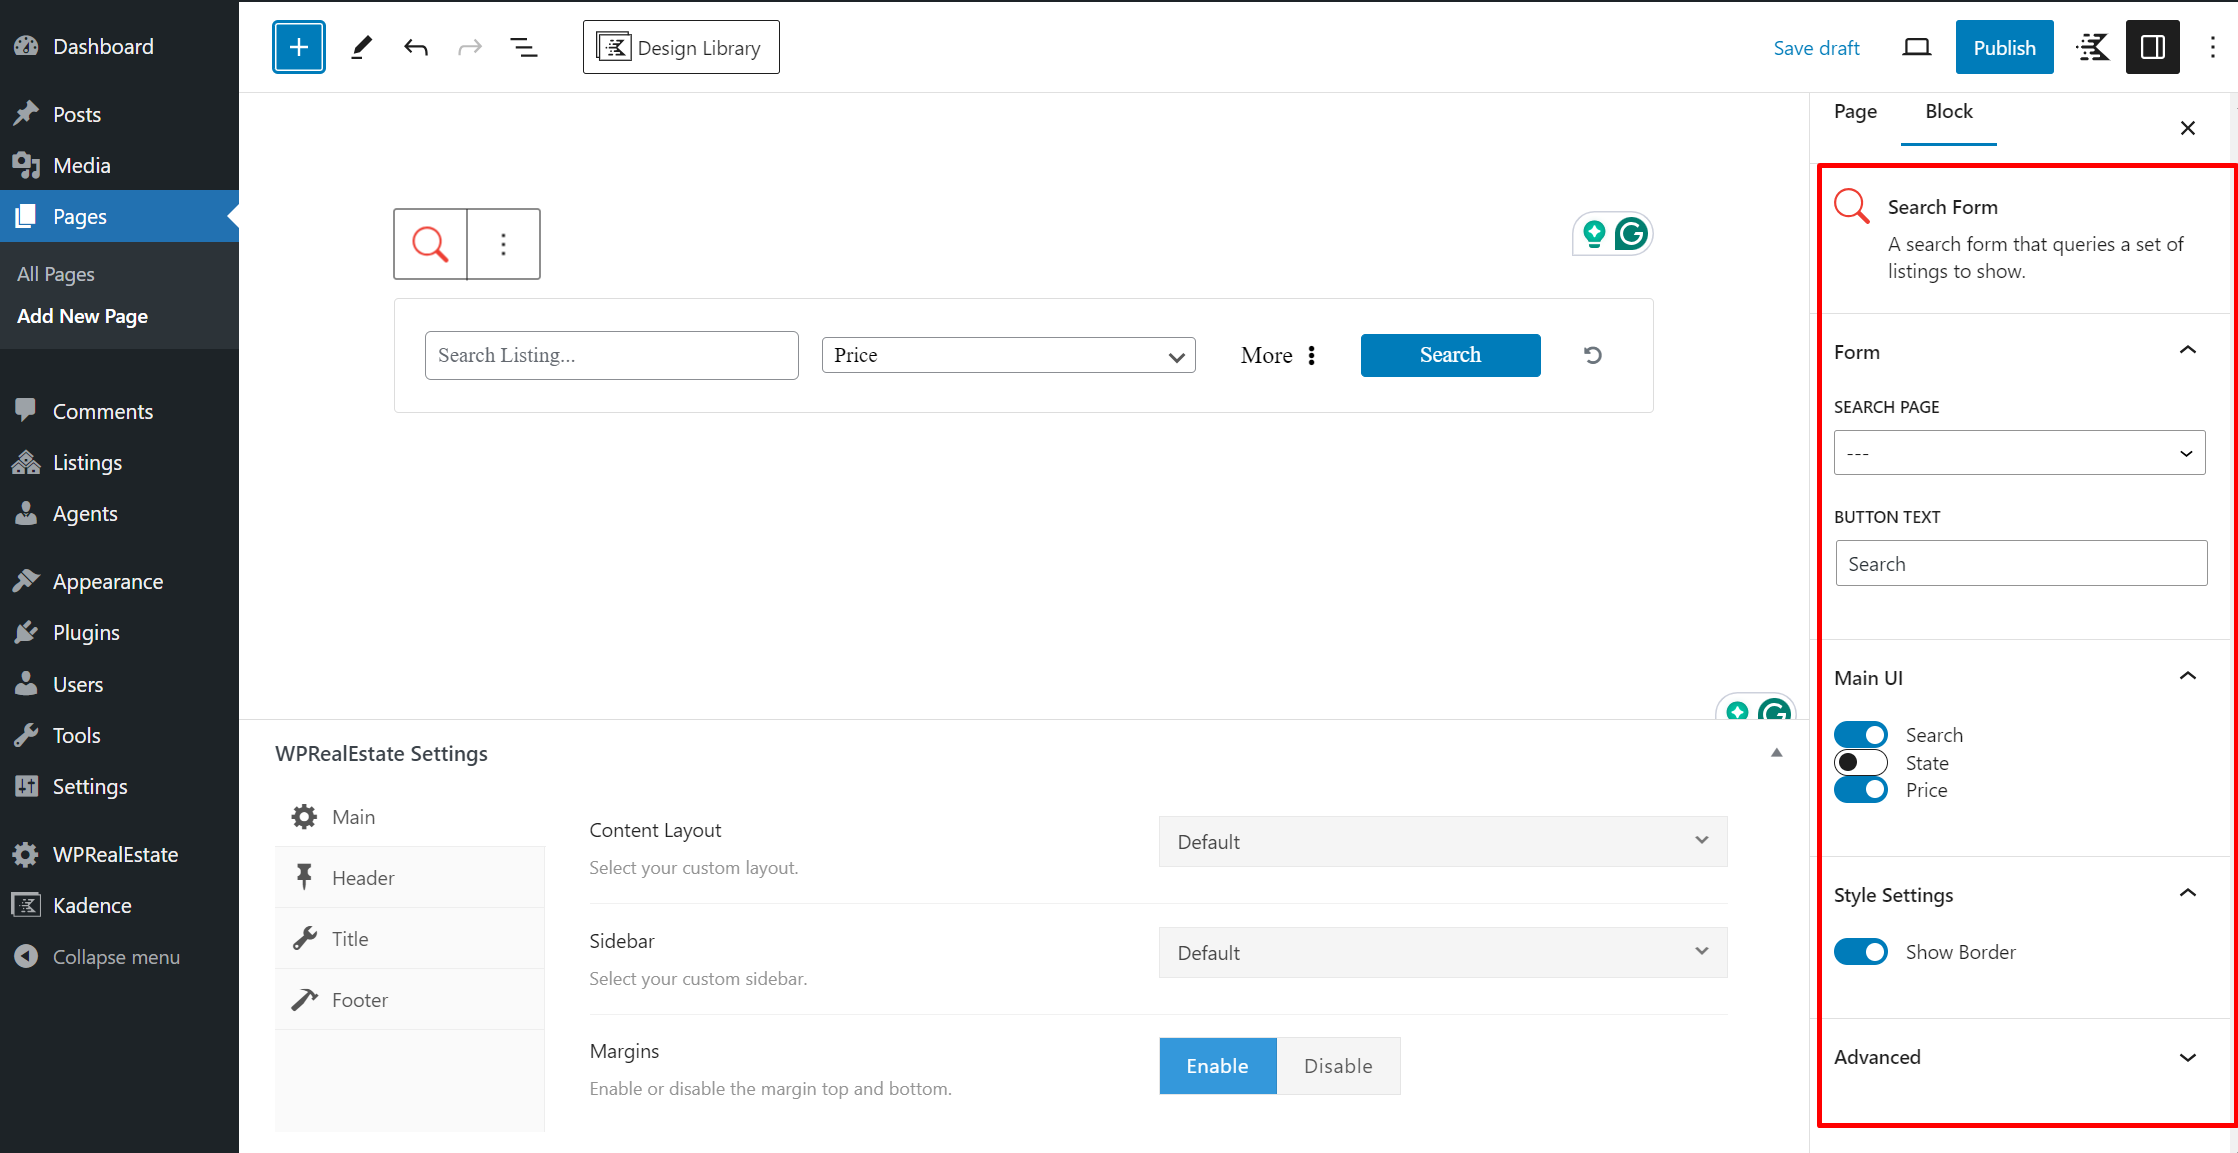
ADD THE BLOCK. Go to any page or post, and add the Search Block.
SET THE SEARCH PAGE. You should have configured a search page for before adding the block. Simply find the Search Page in the list of available pages. Whatever page or post you add the Search Form Block on, when users click to search, they will be taken to the Search Page, where they will see their results and have the option to filter or adjust their search results.
CONFIGURE OTHER SETTINGS. From the block settings on the sidebar, configure any other settings as desired.
The Search Page is a powerful part of this plugin’s functionality.
To allow visitors to search manual or MLS listings on your site, you have two options. You can send them directly to this Search Page. Or you can add a smaller Search Block on any page or post. But the smaller Search Block will ultimately send them to your Search Page to view and filter results.
So ultimately, this is the page where most visitors will search, filter, and view various listings on your website.
CREATE A PAGE. First, create a new page to be your Search Page. You can call it whatever you like.
ADD MAP BLOCK, SEARCH BLOCK, AND DISPLAY LISTING BLOCK. Add a Map Block, Search Block, and Display Listing Block to your page. These three blocks work together to provide a cohesive search and filter interface.
Important details on how to configure these blocks on the Search Page:
- For the Map Block, set the “Map Type” to Search Page.
- For the Search Block, set the Search Page to the current page. You may need to save your page first.
- For the Display Listing Block, be sure to set “Listing Type” to either Manual Listings or MLS. That will determine whether visitors will see Manual or MLS listings on your page. If you want users to be able to search both, you’ll need to set up separate Search Pages for each listing type.
Other than the specific settings above, you can configure display, styling, and other settings as you prefer. Also, note that you can use other blocks on this page if you like. For example, you can put the Display Listing block, or all of the blocks, inside of a Kadence Row block so you can set padding and margins around them.
A SEARCH PAGE WILL ONLY SHOW MANUAL *OR* MLS LISTINGS, NOT BOTH. When you add the Display Listing block to this page, you’ll set whether it should show Manual or MLS Listings. You can only show one listing type on a Search Page. If you want visitors to be able to search both types, create two Search Pages, one for each listing type.
CONFIGURE OTHER SETTINGS. From the block settings on the sidebar, configure any other settings as desired.
When you activate the plugin, a new menu item “Agents” will appear on your main menu.
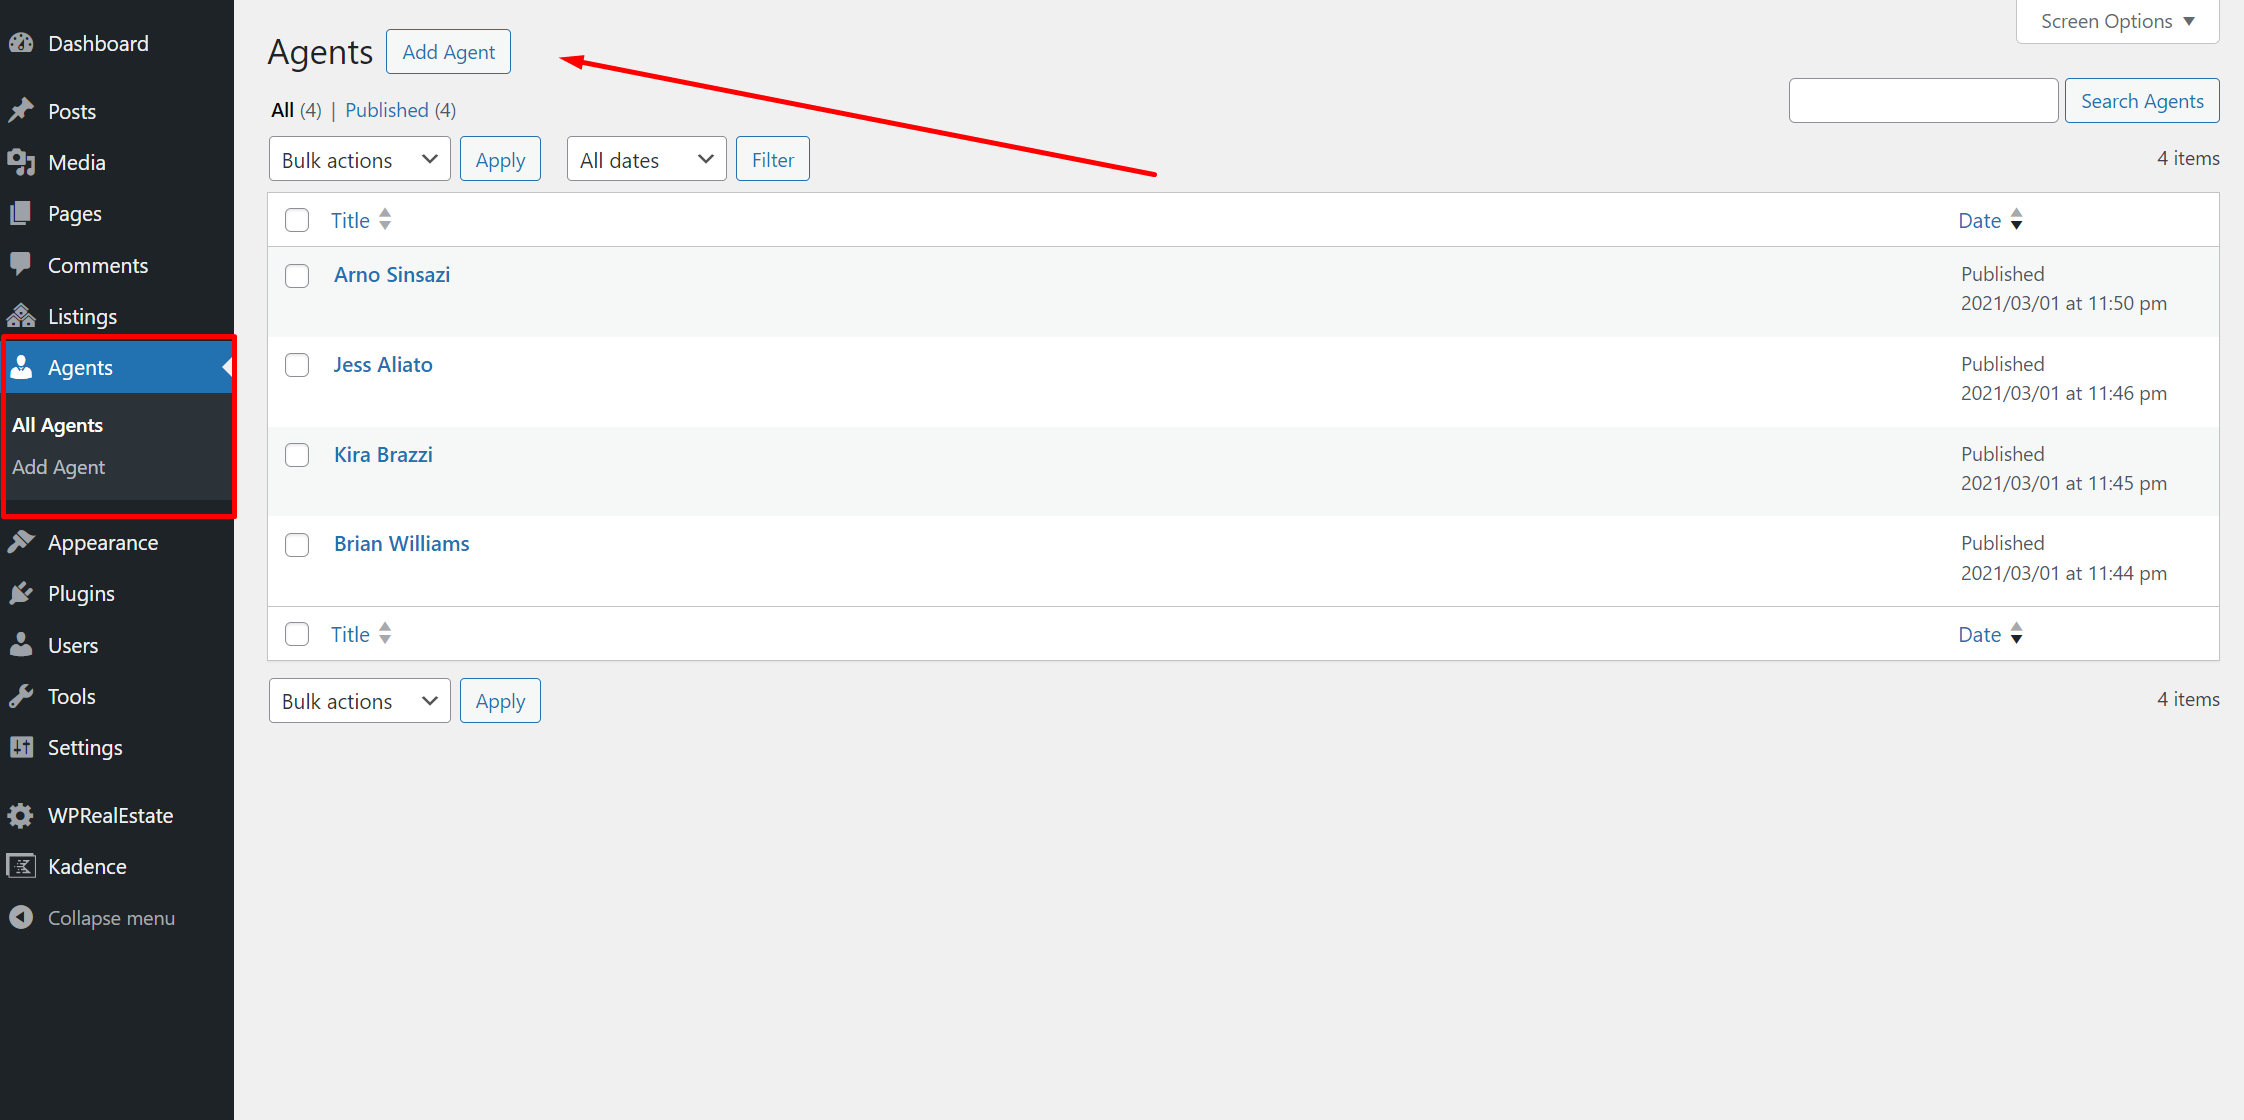
To add an Agent, click on Agents > Add New from the main menu. Each new agent page will be pre-populated with the blocks needed to add your agent.
IN THE MAIN CONTENT AREA
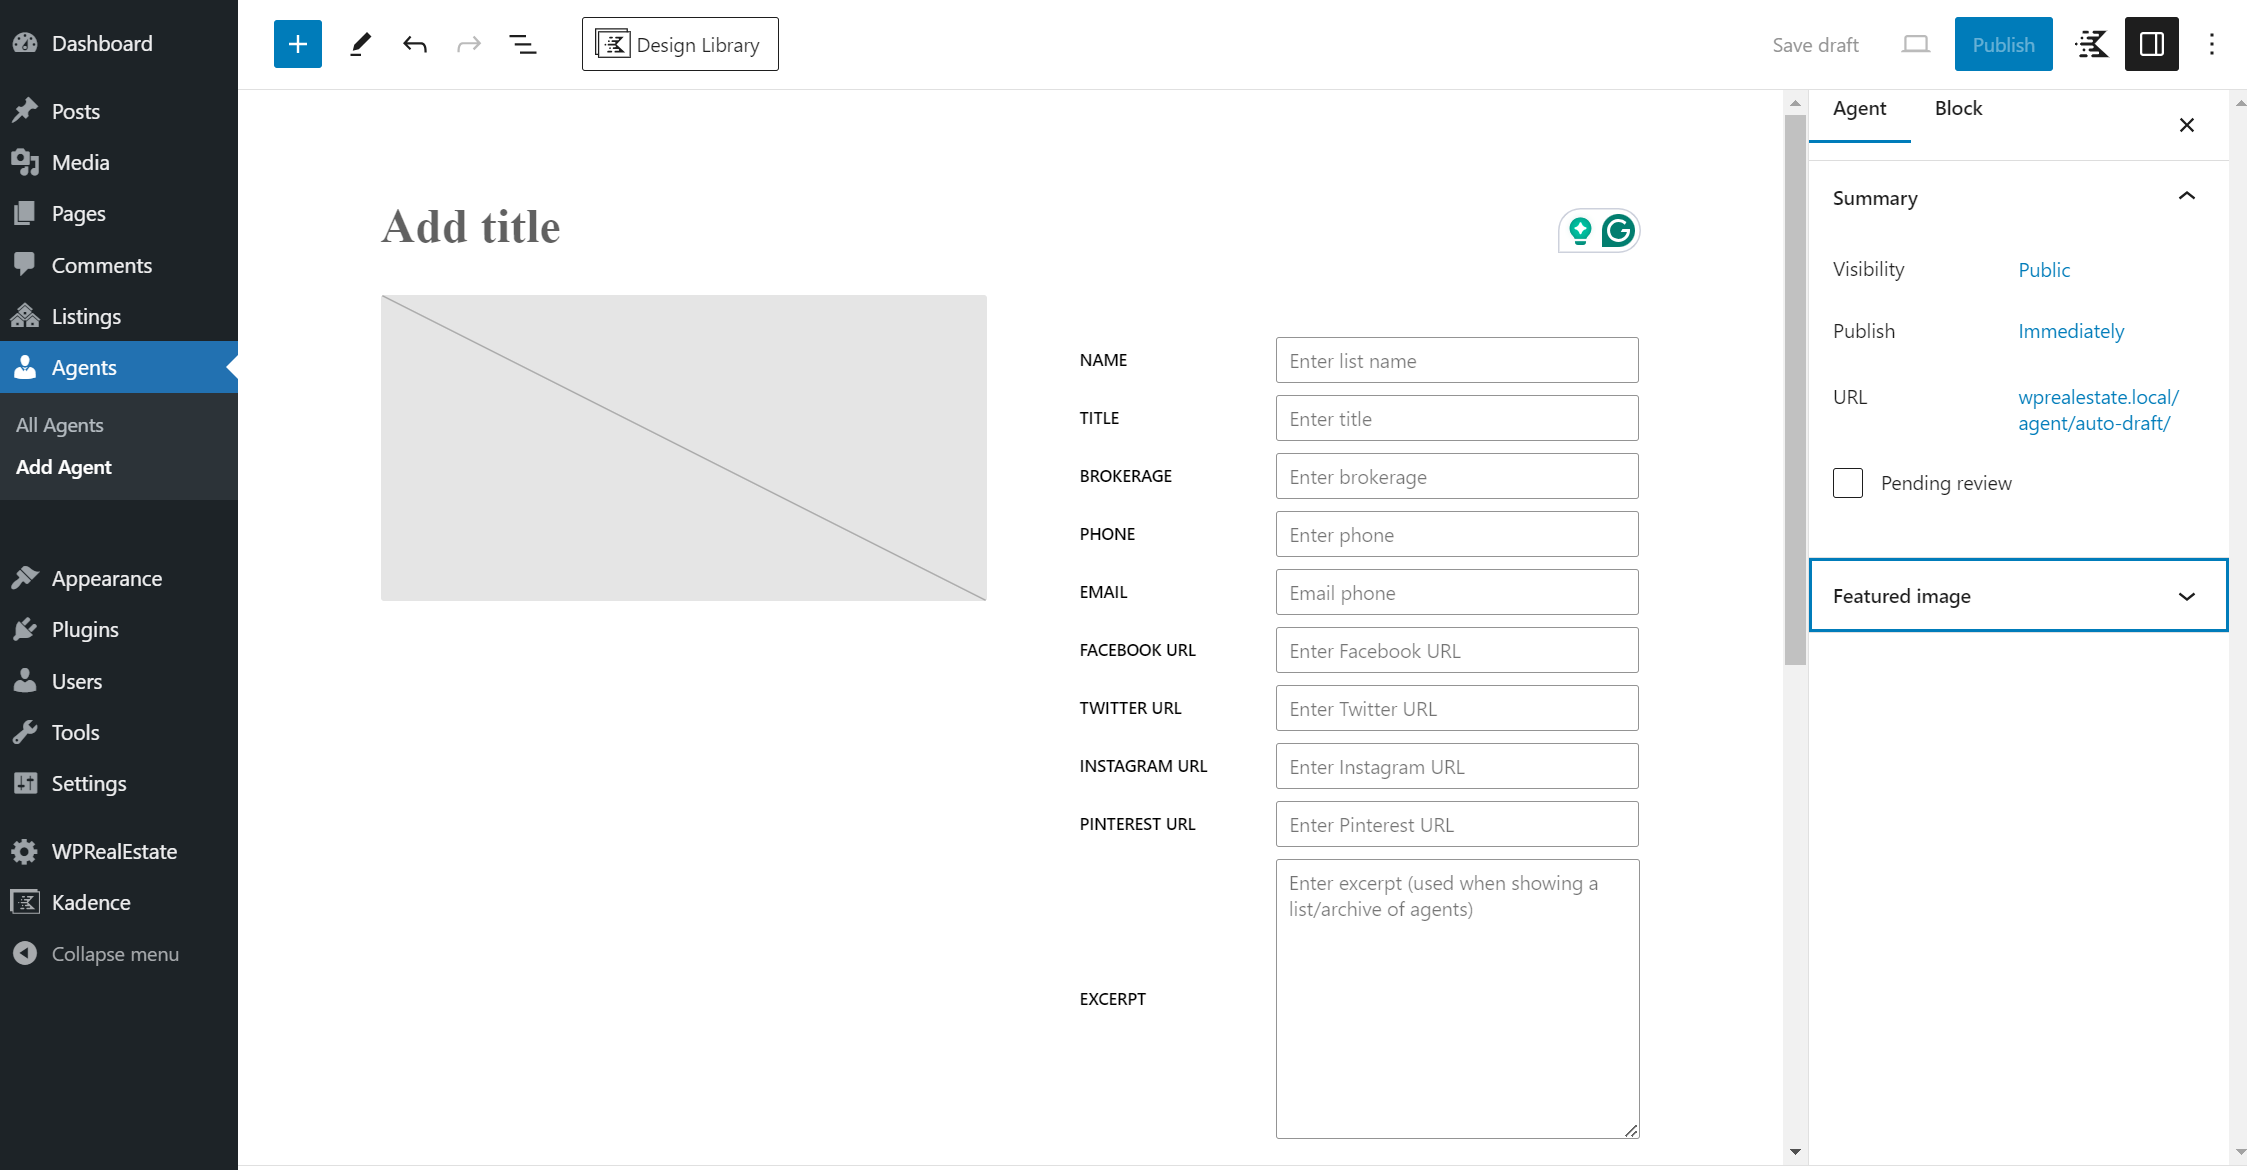
PAGE TITLE. Add a Page title. It’s often useful to use the agent’s name reference.
IMAGE. Add an image of the agent via the image block. Note this is just a normal, core image block.
AGENT DETAiLS. Fill out each of the agent details. None are required, but an agent with complete information will display better and work better for lists, on listings, etc.
Note that the excerpt will be used when viewing a list or group of agents via the Display Agents block. The bio will show on the full Agent page.
ON THE SIDEBAR
FEATURED IMAGE. Add a featured image. It’s often useful to use the same image you used in the content area above. This image will represent the agent when displaying lists of agents.
VIEWING YOUR AGENT
Once you publish your Agent, a page will automatically be created on the front end with all the agent details. The URL for each listing is:
www.yourdomain.com/agent/the-title-of-the-post
DISPLAY AGENTS BLOCK
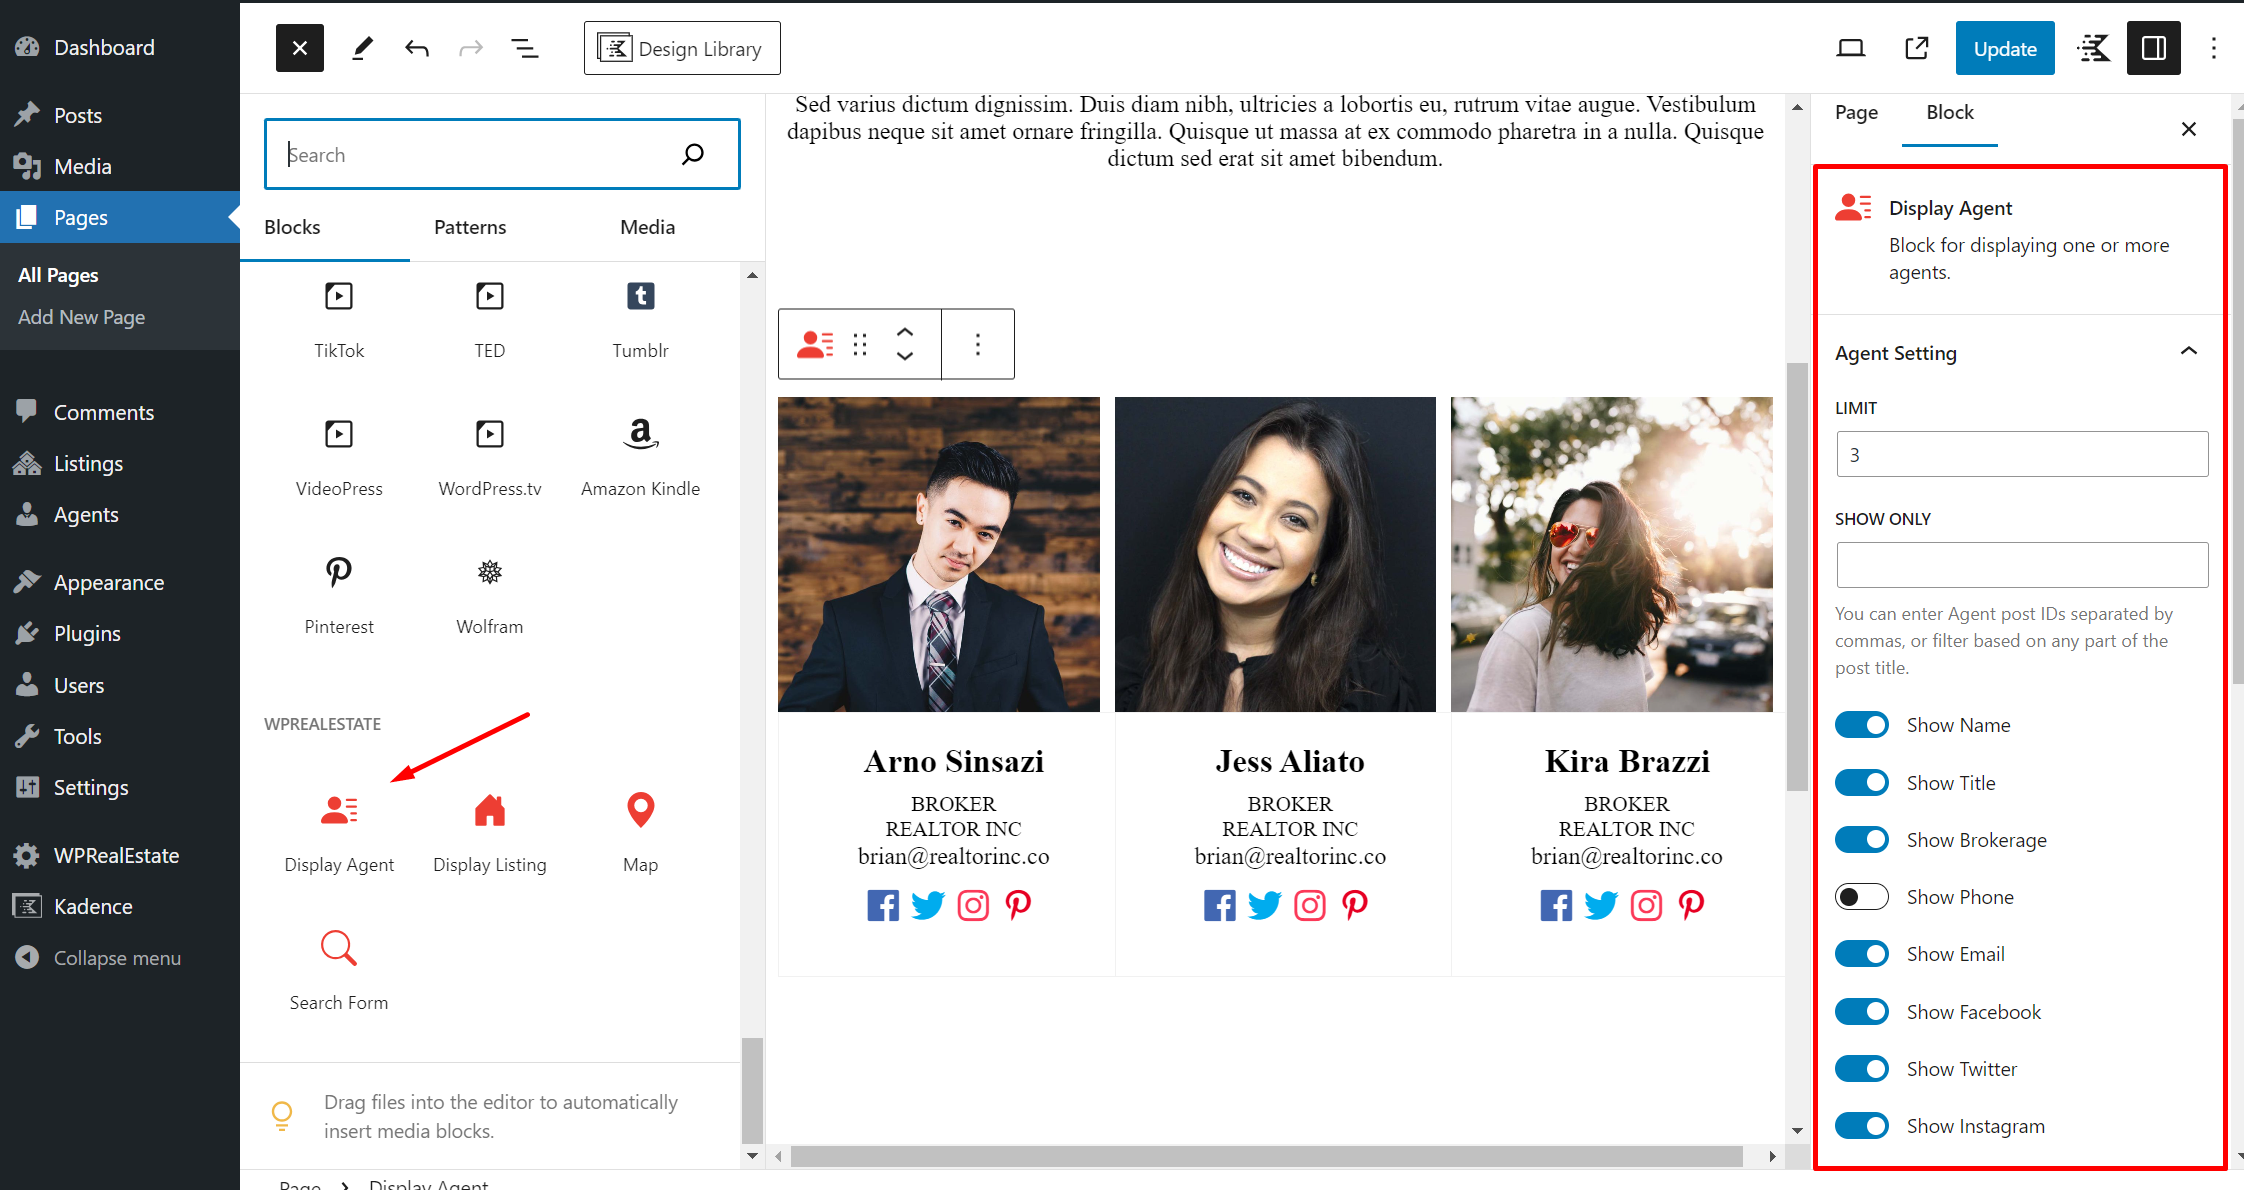
This can be used on the home page or about page or team page or a blog post to show a list of one or more of your agents. Think of it like a blog archive but for agents. If you click on one, you’ll be taken to the agent’s individual page.
ADD THE BLOCK. Go to any page or post, and add a Display Agent block.
SET WHICH AGENTS TO SHOW. You can use the “Show Only” field to filter which agents to show. You can type any part of the post title. For multiple specific agents, just separate each entry by a comma.
CONFIGURE STYLE SETTINGS. From the block settings, you can also adjust the layout, columns, and other styles of the display.