
What’s that?
Are you tired of working on a platform other than WordPress?
Maybe your company is scaling up quickly, or you’ve decided that you want access to the wide variety of plugins offered through WordPress.
Regardless of your decision, learning how to migrate your site to WordPress often seems like a complicated, if not impossible task.
That’s far from the truth.
Sure you could call up a developer to make the migration for you, but why spend the money? If you’d like to migrate from a system like Blogger, Drupal, Joomla, WordPress.com or Tumblr, each of them has a plugin to carry over the data.
After that, it’s just a matter of finding a beautiful WordPress theme that coincides with your brand. In fact, most migrations end up with much prettier websites than the originals, so what are you waiting for?
It doesn’t matter where you’re migrating over from, the goal is to walk through the following steps so that you don’t lose any of your content or design:
- Document all elements of your site
- Create a WordPress site to prepare for the migration
- Import all content to the new WordPress site
- Configure a design that’s similar to the original
- Make sure everything looks good for launching your site
Some free sites like WordPress.com and Blogger are a little different in terms of the migration. Therefore, we’re going to outline the WordPress.com process, before platforms like Drupal and Joomla, to show you the differences.
How to Migrate from WordPress.com to WordPress.org
Many newbie bloggers get their start with WordPress.com. It’s generally used for free, with a domain hosted by WordPress and access to free themes and the default plugins. However, if you’ve decided a more professional site (with a real domain name, self-hosting, unlimited access to plugins and full control over your website) is more your style, it’s a good idea to migrate your WordPress.com site to WordPress.org.
We know, the similar names make it rather confusing, but you can learn about the difference between WordPress.com and WordPress.org here or from this nice Infographic (click the Image bellow)
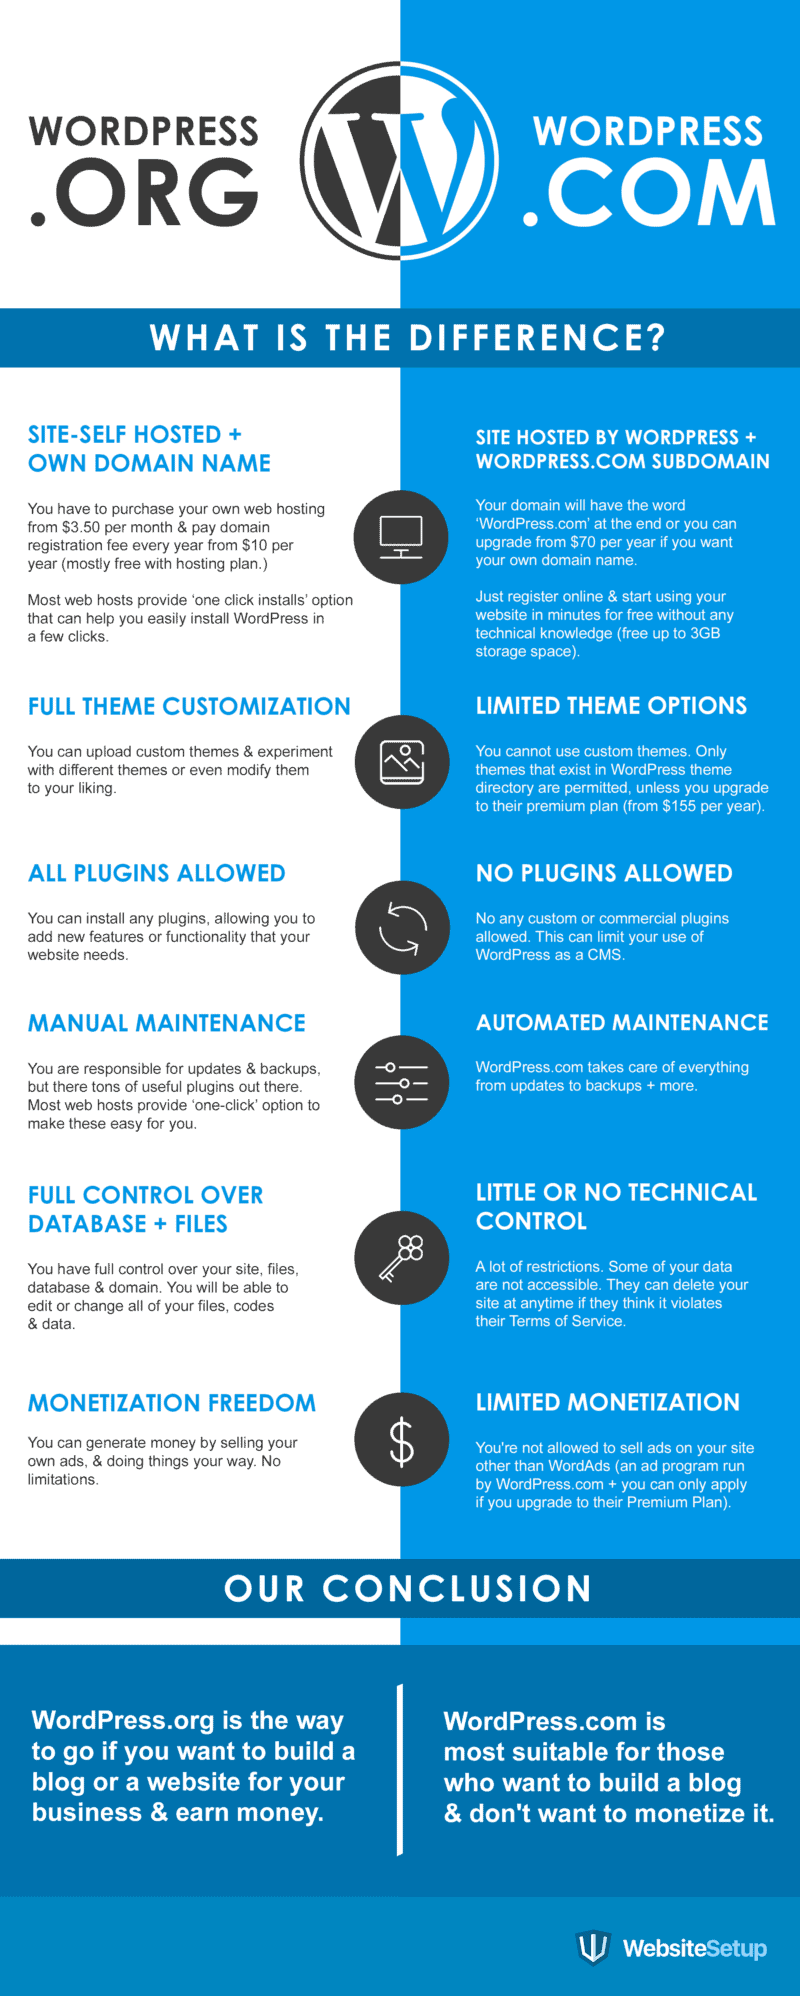
In short, you get the following benefits when moving to WordPress.org:
- Use any commercial theme you want.
- Implement any plugin in the WordPress library.
- Get your own domain, and gain full control over your site with self-hosting.
- Monetize your website.
- Learn more about development and website maintenance.
- Make as many changes to your site CSS as you want.
Now that you can see how necessary WordPress.org is to run a site that you’d like to make money with (whether it be a blog, eCommerce shop or informational business site) let’s take a look at how to quickly migrate from WordPress.com to WordPress.org.
Step 1: Make Sure You Have a Domain and Hosting Account
As we talked about at the beginning of this article, your first step is to find a reliable hosting provider, you can choose from this 5 hosting providers we’ve compared and see which one suits your needs. Pay for your hosting account (this generally starts at around $3.49 per month,) then search for and select a domain name through that host.
If you’d like to use a domain name that you currently own, we’ll talk about how to transfer that over to the new site.
We also have a solid article with four easy steps for finding a host and setting up your WordPress site.
Step 2: Export Your WordPress.com Data
Open the dashboard to your WordPress.com site. On the left-hand side, go to Tools > Export.

This reveals two options for you: Free or Guided Transfer. If you really don’t want to spend any time on the transfer, pay for the $129 guided transfer. However, if you’d like to learn something new and walk through a pretty easy process, select the Free option. Click the Start Export button to proceed.

The next page asks which content you’d like to export, so since you most likely want everything like posts, pages, comments, custom fields, images, tags, categories and menus, check off the All Content box.

Click on the Download Export File button to save an XML file with all this content onto your computer. Just make sure you know exactly where this file is located for later.
Step 3: Install WordPress.org on Your Hosting Account
You may have done this already, but in order to import your old content, it’s required to have a WordPress.org website installed in order to place that content on the new site.
You can install WordPress in just a few minutes (5 minutes install), but most hosts, including Bluehost, have a one-click WordPress installation button you can find in the backend of the hosting platform.
Simply click on the Install WordPress button and walk through the steps to complete the process.

Step 4: Import Your WordPress.com Content into the New Site
Now that you have a new self-hosted WordPress site configured, you can grab that XML file and import it.
Login to the backend of the new self-hosted site. Select Tools > Import.

This reveals a large list of places you can import content from. The very last one on the list, called WordPress, is the one you want. Click on that.

Install the WordPress Importer

Once the plugin is installed, it asks you to upload the XML file and import it. Therefore, walk through these steps until the file is completely imported onto the site. Keep in mind that a few boxes should be checked along the way. First, you can assign all of your old content to an old or new user. If you already have a user setup, consider doing that. Second, make sure you check the box that asks if you’d like to import all old attachments. This helps with images being imported.
Step 5: Set Your Old Site to Private So No One Sees It
You have two options to decide between when dealing with your old WordPress.com website. You could redirect the old site visitors to the new website or simply make the old site private so no one can see it anymore.
We generally recommend redirecting visitors, but if your site doesn’t have many visitors you may just want to completely block it.
In order to do so, open the WordPress.com site (your old site) dashboard and go to Settings > Reading.
Scroll down the header that says Site Visibility and select the option that reads I would like my site to be private, visible only to myself and users I choose.

Once again, if you’ve built up some SEO and followers, it would be wise to skip this step and redirect those people and search engines to the new site, which we’ll cover in the next step.
img
Step 6: Redirecting Your Links and Sending People to the New Site
Unfortunately, you can’t do anything manually to maintain SEO rankings with a transfer from WordPress.com to WordPress.org. However, you can pay for the Site Redirect tool if you’ve built up some solid search engine clout from your past site.
This tool costs about $13 per year, and you can keep that going for as long as you think it’s necessary. Once it’s setup you type in the domain name you’d like to redirect to and let it do the work for you.
Step 7: Update Your URLs
Rewriting your old links and pointing them to new places is a pain in the butt. For example, you may have some internal links scattered throughout your website, but when you import post data, these links are still going to send people to the old URLs you linked to. That’s a huge problem considering it could take months to find and change all of these. Oh yea, and if you don’t fix the URLs, you’ll end up getting bashed by the search engines.
So, install the Velvet Blues Update URLs plugin, and activate it on your self-hosted WordPress site.
Go to Tools > Update URLs.

This brings you to a page where you can punch in the old URL and new URL. Select which of the URLs you would like to be updated and click on the Update URLs Now button.

That’s it for migrating from WordPress.com to WordPress.org!
How to Migrate from Specific Platforms Like Joomla, Blogger and Tumblr
If your website runs on something besides WordPress.com, you have tools for transferring over the content and making the site design look as close as possible to the original setup.
Note: Since you’re deciding to go through the process of migrating your site, it’s worth noting that not every element is going to look or work exactly the same. Therefore, it’s a great idea to try to keep the branding of your site, so people can recognize you while also working to improve the design by finding a fresh new theme, better plugins and other elements that can give you a new presence online.
Step 1: Get Started with WordPress Hosting and Your Domain Name
As with all migrations, the first step is to find a hosting account and domain name. You must walk through the process of signing up for a host and clicking on the one-click WordPress install to gain access to the WordPress dashboard. This serves as your completely new site, where you’ll import the content.
If you plan on using the same domain on your new site, make a subdirectory for installing the new WordPress site. Then you can move it to the real domain once the migration is done.
Go to Settings > Reading in the new WordPress dashboard and start configuring how you’d like your settings to be established. For example, you may want your latest posts to show up on the homepage, along with 10 posts to show up on the homepage.

You can also play around with the following areas on the dashboard to ensure you are completely set up before the migration:
- Users
- Menu navigation
- Permalinks
Step 2: Find a Theme That Works for Your Brand
Select a WordPress theme that coincides with what you’re trying to accomplish on the new site. For example, you have to consider if your site offers some of the following functionalities:
- ECommerce
- Online courses
- Restricted content
- Responsiveness
- Multiple languages
- Multiple pages, or one page
- Forums
Check to see if the theme you decide to buy fits with your brand and accomplishes all of the tasks required. For example, an eCommerce store most likely wants a theme with WooCommerce compatibility, while a site that needs a forum would look for a theme that’s built for bbPress.
We highly recommend checking out our article on what elements make a good WordPress theme. This way, you don’t end up regretting your decision.
Also, remember that your design isn’t going to look exactly like the old site, so look for a theme that’s an improvement compared to the old design, but one that also keeps your branding intact.
Step 3: Don’t Forget About the New Plugins
Since sites from Joomla, Drupal, Blogger and other systems have varied setups, you may have to install WordPress plugins and widgets to replicate some of the tools and settings you had with your old site. For example, most WordPress sites need plugins and widgets for the following:
- SEO
- Security
- Caching
- Social buttons
- Maps
- Advanced stats
- Maintenance mode settings
- Multiple languages
- Backups
- Shortcodes
- Contact forms
You may even need to dive into more specific plugins for things like:
- Forums
- Social networking
- Donations
- Events
- ECommerce
- Deals and coupons
- Courses
- Real estate
Installing and activating these plugins should be done after you decide on and install a theme. After all, you have no idea what your courses, products or payment buttons are going to look like until you get the proper theme in there.
Step 4: Bringing All Old Content Into the New WordPress Website

Here’s where you bring over the majority of your content. Go to Tools > Import in your new WordPress dashboard. This reveals a list of platforms you can import from. Some of them include:
- Blogger
- Tumblr
- LiveJournal
- We already talked about WordPress.com above.
It all depends on the system you’re transferring from, but in general, this step brings over posts, comments and users.
This is basically just a list of links to plugins, so we’re going to cover some of the plugins to use for migrating from the most popular platforms:
Blogger Migration
For Blogger, you can click on the Blogger link under Tools > Import.

Install the plugin and run the process to transfer over items like categories, posts, comments and images. The items that are not going to be imported include comments and author avatars, pages, widgets themes. However, you can get your own WordPress theme and fill in the pages, avatars and widgets yourself.
Tumblr Migration

The Tumblr Migration plugin handles the following for your migration:
- Media items
- Posts
- Drafts
- Pages
- Post formats
Therefore, run the plugin to carry over the data, and wait until it’s complete to move onto the next step.
Joomla Migration
The FG Joomla to WordPress plugin is your best bet for a Joomla migration.

It’s not located in the Tools > Import area of your WordPress site, so you must install it by going to Plugins > Add New.
This is a pretty cool plugin because it carries over the following elements:
- Sections
- Categories
- Posts
- Images
- Media
- Tags
If you pay for the premium version (which is recommended for a medium to a larger site,) it lets you migrate items like authors, users, menus, pages and meta data.
Regardless of which one you go for, all you have to do is walk through the steps in the plugin to properly migrate the data.
Drupal Migration
Drupal is one of the more complex migration processes, and WordPress doesn’t have a direct plugin link in the Tools > Import area. So, they recommend going with the Drupal2WordPress plugin, which transfers items like tags, comments, users, posts and media. Download the plugin to your computer, upload it to your WordPress site, then run the system.
Are You Working With a Platform That Isn’t Covered in This Article?
From PrestaShop to Dotclear, some of the more niche, or lesser used, website systems have plugins and procedures for transferring over content to a new WordPress site. It would take a book to cover each and every one of them, but if you’d like to figure out how to migrate with a quick tool, WordPress offers a solid page with directions for each.
Some of them are more complex than others, but WordPress does a good job of locating reputable services, scripts and plugins that can get the job done.
Step 5: Go Live
Once you’re ready to go live with your new site, you can choose between two options:
Move the Old Domain to the New Site
If you decided on a new domain, you don’t have to worry about either of these methods, but the first option is to move the old domain to the new site host. If you’re keeping the same host used before, you shouldn’t have to worry about moving the domain. However, a move from, say, GoDaddy to Bluehost requires you to move said domain to Bluehost, from GoDaddy.

It’s best to simply contact the hosting provider for this. For example, Bluehost has some guidance on how to transfer your domain here, and much of it tells you to call them and your old host.
Redirect the Old Domain to the New Site
The point of redirecting is so that when someone types in the old URL they are automatically sent to the new site. Sometimes a redirect can be completed through your old platform, but in general it’s best to speak with your host to change the name servers on the new domain.
Important: Place your site into maintenance mode until this entire process is complete. Let your customers know what is going on, and explain to them that they should follow you on social media or give you their email address for more information. The key is to communicate with people so they can get to the new site next time.
If you’d rather not migrate your site and domain manually, or with the assistance of your hosting provider, the following plugins get most of the work done for you:
Step 6: Change Your URLs
Since you may have internal links from your old site on pages and posts, they won’t work unless you update the URLs. This is just like the method we used for migrating links from WordPress.com to WordPress.org. Install the Velvet Blues plugin and walk through the process of changing your old domain links to the new ones.
This way, if you have a link that goes to another post on your website, it won’t bring up an error.
Step 7: Think About Your Design
The majority of the steps we’ve walked through include details for moving over the raw data on your site. Everything from pages to posts, links to users should be ready to go on the new site. However, you may not be particularly pleased with the site design. Since the migration requires a completely new theme, you’re going to have to put in some work configuring certain items.
Therefore, use the following list to remember what needs to be checked and possibly moved, redesigned or implemented with a plugin:
- Menu
- Homepage
- Footer
- Custom CSS
- Background
- The commenting system
- Contact forms
- Newsletter signup forms
- RSS feed
- 404 pages
- Media
- Header
- Custom post types
- Categories
- Broken links
- Buttons
- Redirects
- User names
- Social media links
What to Do After You’ve Gone Live
Just because you’ve successfully migrated and published your new WordPress site doesn’t mean that you can sit back and relax. Problems are bound to arise, so it’s wise to keep your eye on what’s happening. For example, some of the links may not be redirecting properly. You may notice that some posts are not revealing images. The new theme might not be working well with some of the plugins.
Regardless, you should go through the following steps to ensure nothing is going wrong:
- Consistently check your stats to see if you’ve lost any traffic, or if you’re receiving any errors.
- Search for your business through Google to understand if your search engine rankings were affected due to the migration.
- Let your customers know that you’ve made a migration, and ask them to provide feedback if they notice anything going wrong. It’s not a bad idea to post a survey on your website and give away something nice for people who participate.
- Use GTMetrix to see how your site speeds are holding up. A new server could respond differently to your content. We also recommend installing the P3 Plugin Performance Profiler to see if any of the new plugins are slowing down your site. You can uninstall this after running it.
Here are some other essentials to cover after installing a new WordPress site.
There you have it! Whether you’ve migrated to WordPress from Joomla, Drupal, WordPress. com, Tumblr, Blogger or one of the various other website platforms, we wish you luck in the process, and please feel free to drop any questions you may have in the comments section below.


john divramis
21 Mar 2016Very nice and simple but the problems starts when you face some incompatibiloti issues maybe with the databases when you transfer a website from joomla to wordpress.
Beth
22 Mar 2016What about a .asp site?
Tesla
25 Mar 2016here’s an article related to your question.
Vrushali
21 May 2016I just landed on your blog & it’s very helpful for me… Thank you for this walkthrough!!! Just followed all the things and have to say that’s a great article. I have managed to migrate my blog of over 70 posts to a new one and not lost anything. Everything moved over fine.
Quick question – When I was moving my blogger blog to a WordPress theme that does not allow me to have my blog on my homepage or index file. The theme is designed for the blog to live in a separate folder [site[.]com/blog].
Is this putting my blog in a subfolder will mess up my SEO or blog feed? I do not have a feed burner account so am I correct to assume that my subscribers are using Atom for the feed?
I’m confused and don’t want to lose rankings or feed subscribers…